Creative Techniques

People We Meet On Vacation

A GUIDE TO THE UNTHINKABLE: INCLUDING PEOPLE IN YOUR LANDSCAPE PHOTOGRAPHY

Picture this: you’ve spent weeks planning a sunset shot in a beautiful valley surrounded by impressive peaks and dotted with blooming wildflowers. A small reflecting pond sits in the foreground, bouncing the light and adding a surreal mirror image to the scene. You’ve spent hundreds of dollars on airfare, car rental, and lodging. Finally you’ve arrived at the spot two hours before sunset, ample time to find the right composition, set up the tripod, and dial in the camera settings. A few other photographers are nearby too, but there is plenty of space for all and an unspoken understanding that everyone is here for the same reason. Even among introverted landscape photographers, there is chat and camaraderie (except for that one salty old guy... there always seems to be one!) The golden hour is near, the sun sinking lower and softening by the minute. And then it appears… at first a distant speck on the horizon, then rapidly gaining ground, now audible and even larger than expected. You hope it will pass by, but it slows and then turns toward you, crackling over loose gravel. With a piercing pneumatic clap, a full size tour bus announces its arrival, belching out a steady stream of tourists now engulfing the landscape like rising floodwaters. Your image is about to be ruined by selfies, family photos, and influencers. The bolder ones might even interrupt your shoot and ask you to take their picture.

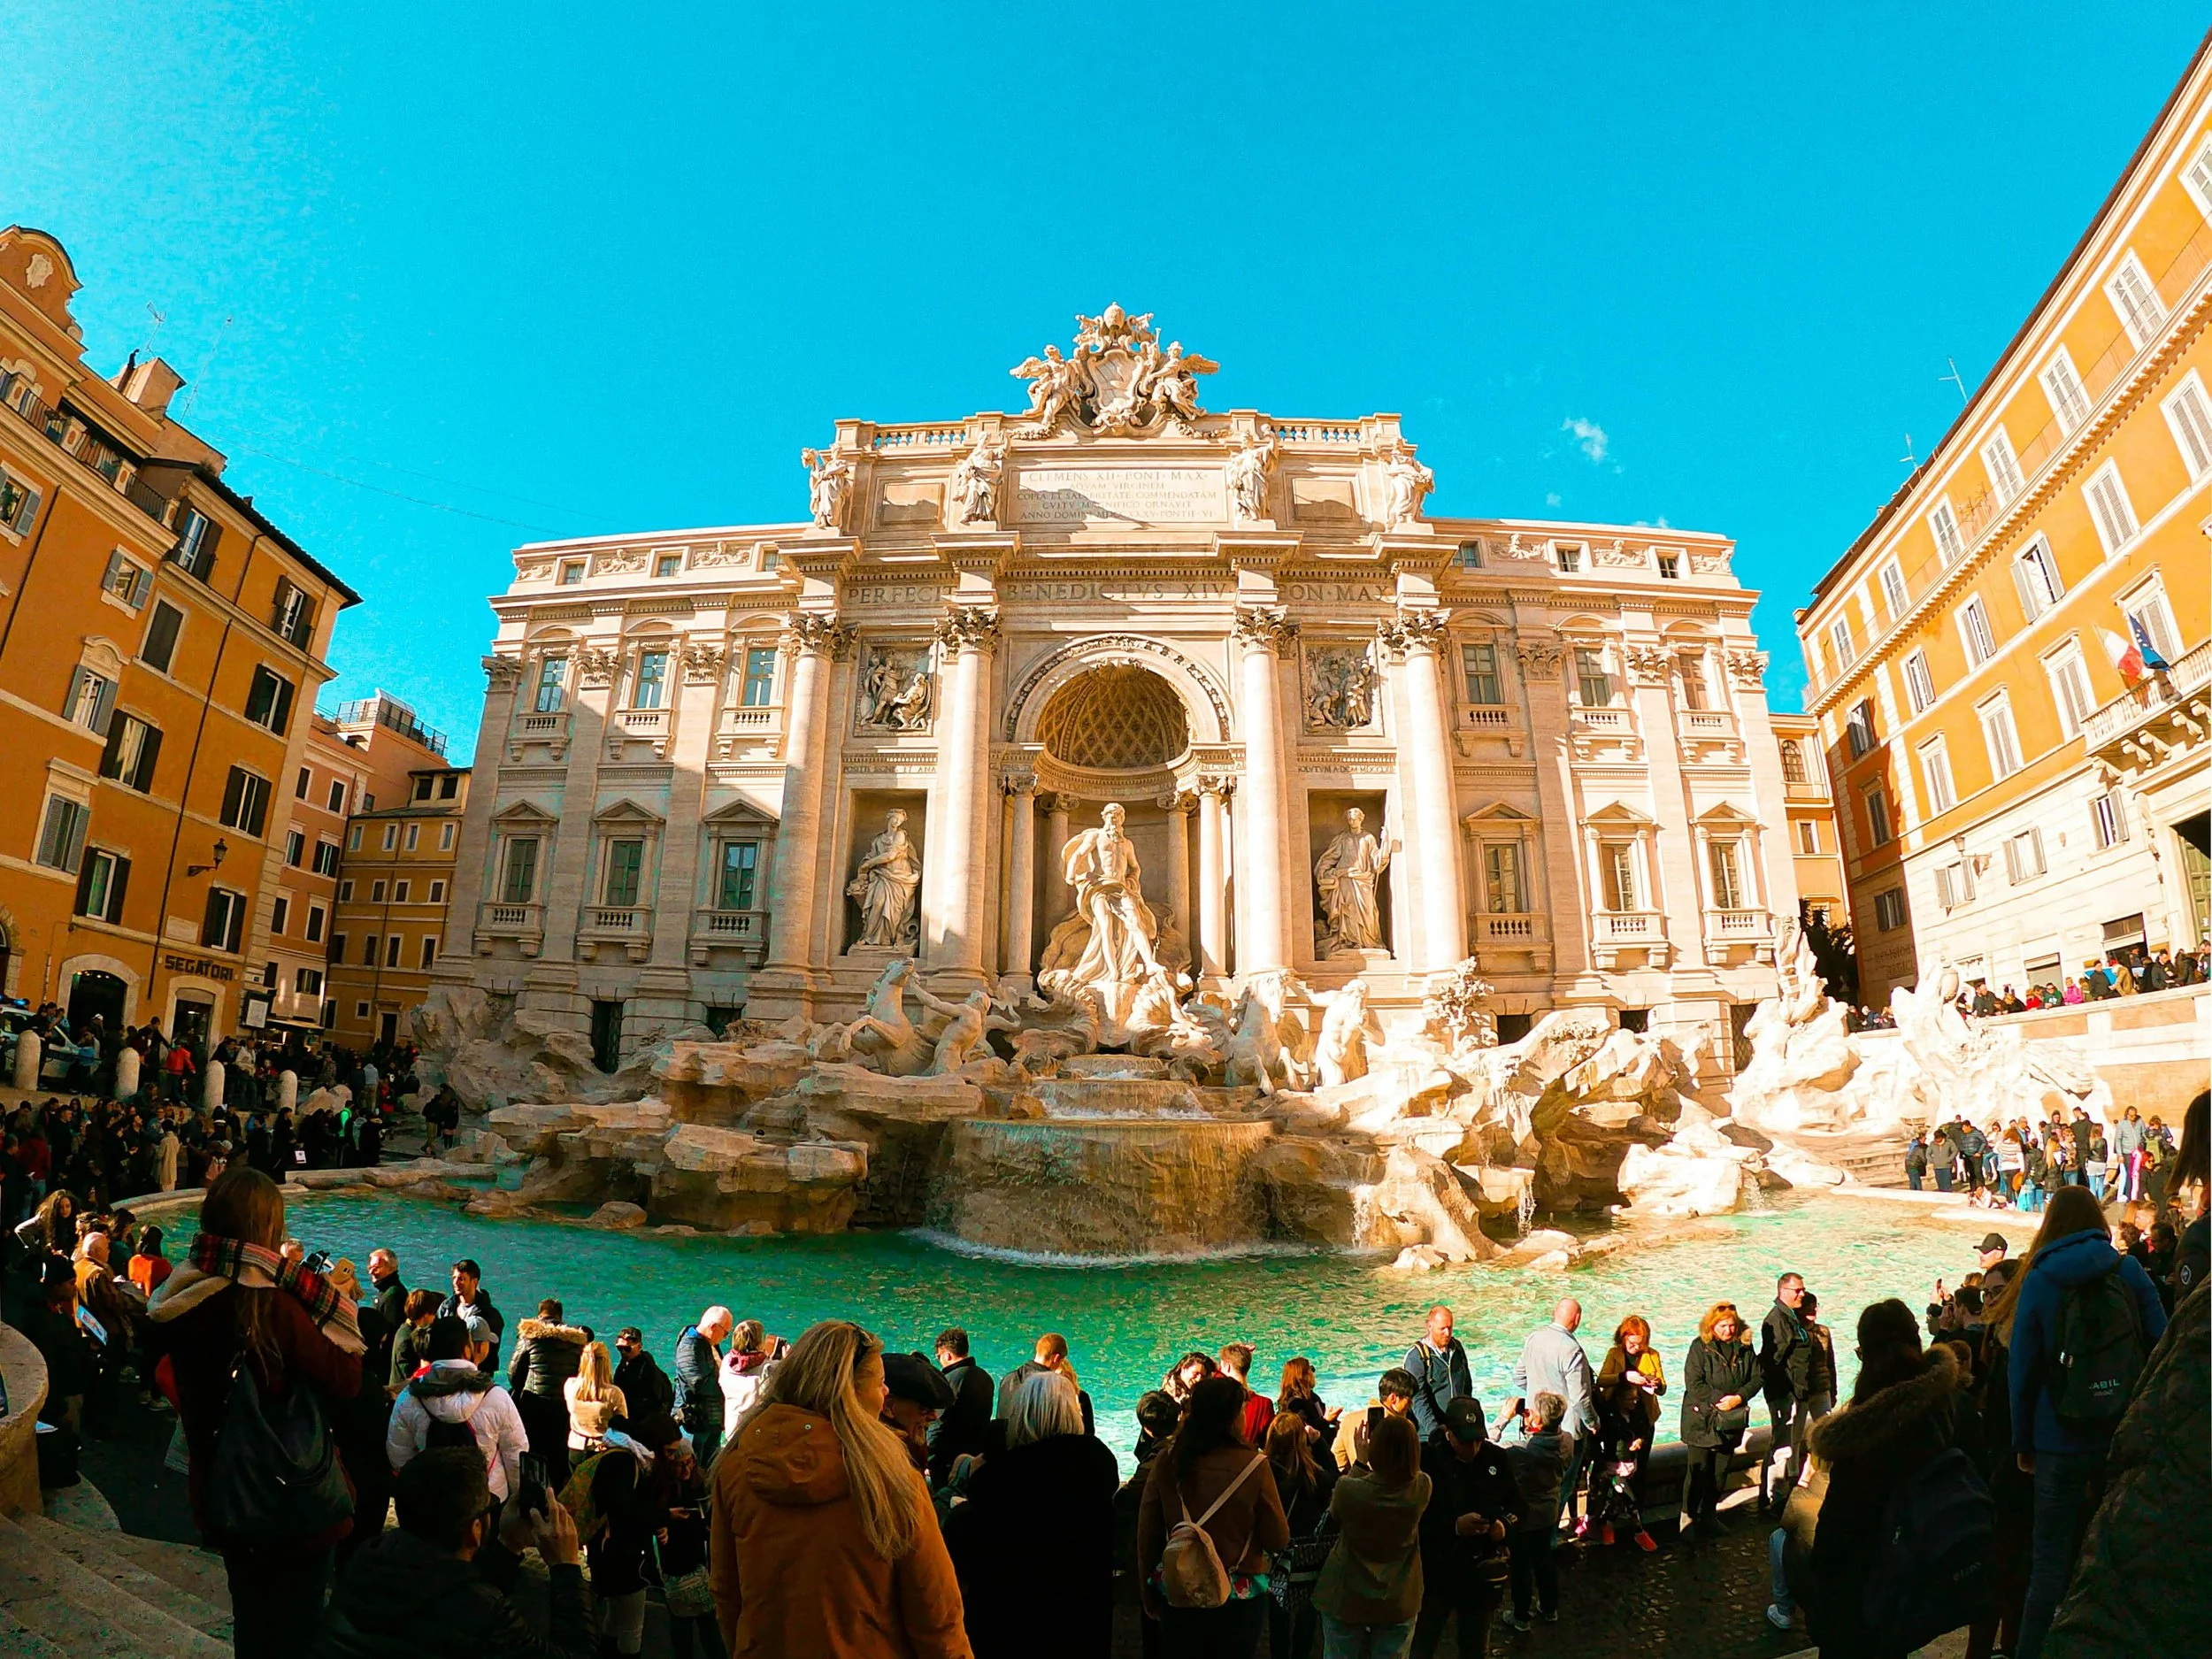
Rome’s Trevi Fountain averages 30,000 daily visitors (Photo: Martino Grua)

Over the years I’ve experienced this scenario many times and have used various methods to remove people from my photos. Sometimes asking people politely if they could briefly step out of the way is the best approach. Other times there are simply too many people for this to be feasible, especially in popular locations. Photoshop provides numerous tools including cloning, statistics, and more recently generative fill (effectively an AI-based eraser) to strip out unwanted people from the image.

Some images, however, are actually enhanced by including a person. I know this his is blasphemy to the purists — landscape photographers are almost atavistically opposed to any people in their shots. But hear me out: people are instantly recognizable elements in a photograph, and that provides context and scale to the viewer. This is especially effective in demonstrating wide landscapes and tall features. I’ve even used people in my underwater photography to emphasize the relative size of a subject, be it an animal or a shipwreck. The key to including a person is that their presence adds to and does not distract from the story. Let’s have a look at a few examples where people genuinely improve the shot:

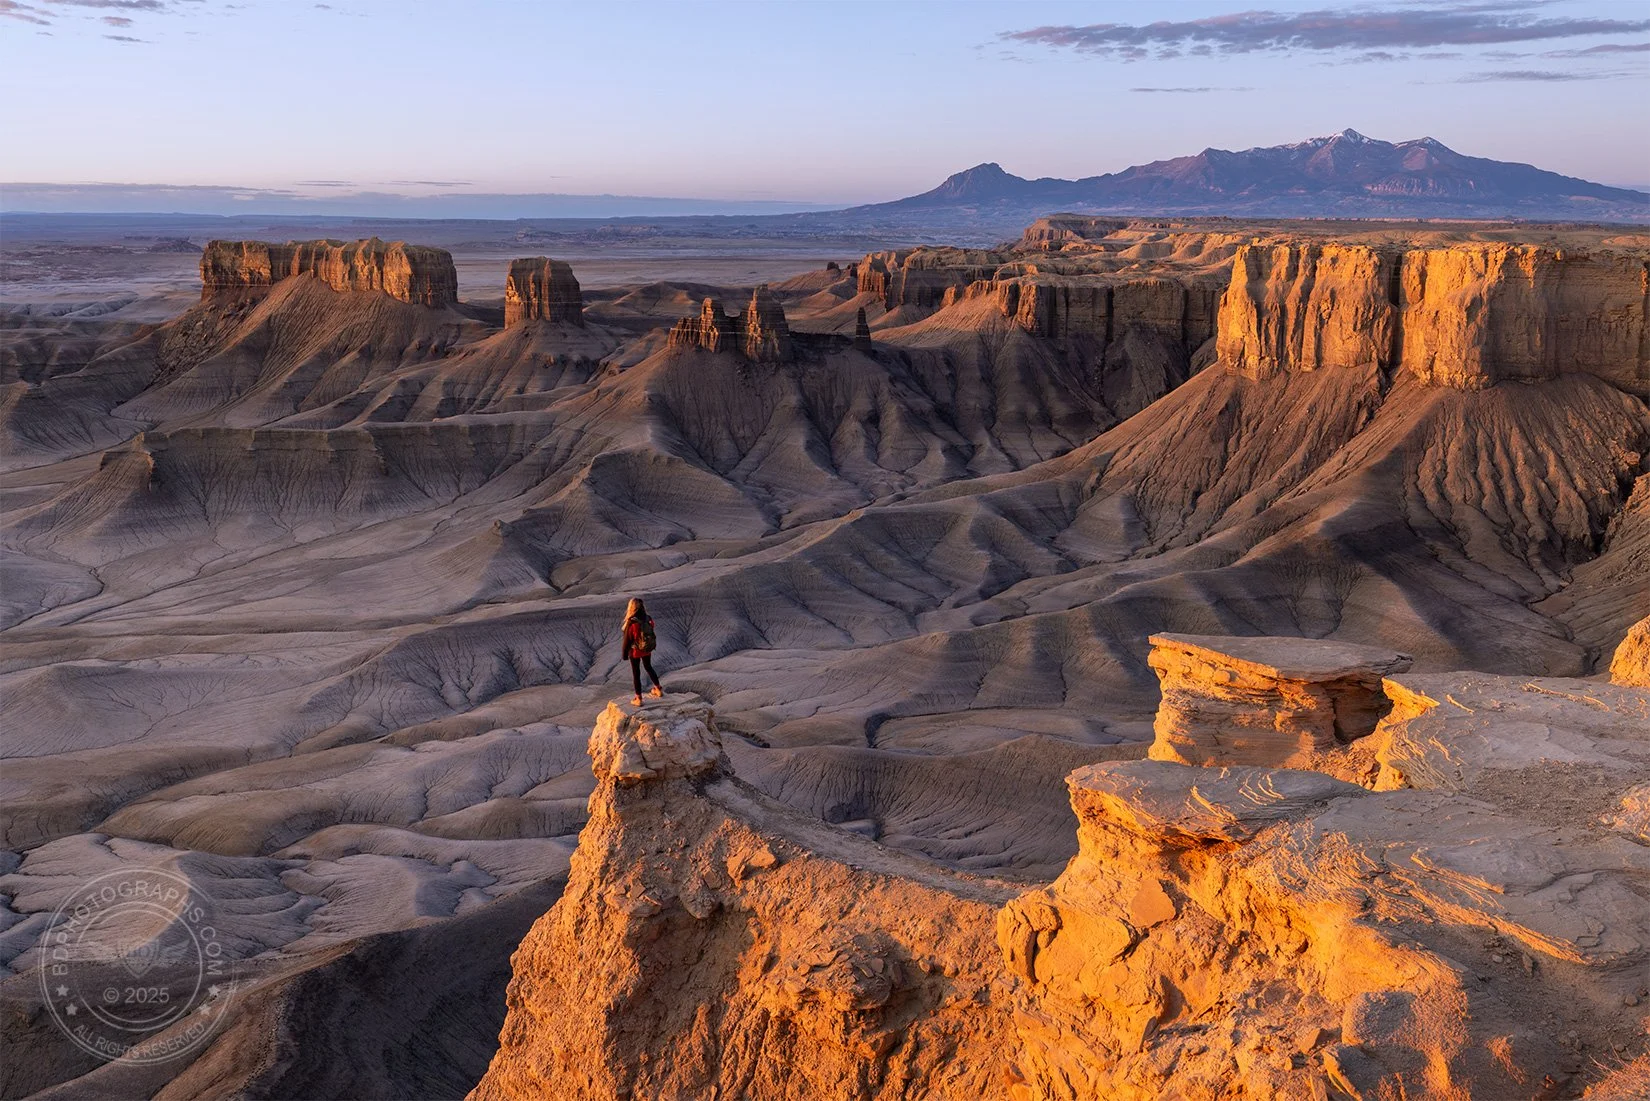
The vast desert landscapes in Utah stretch for miles, and the abstract formations can be difficult to comprehend without a reference point. In this image, a young woman stands on a steep pinnacle overlooking a deep canyon. I would never ask anyone to take on something this dangerous, but it happened to be something she wanted to do. A fall from this point would certainly be fatal with nearly a 1400-foot drop into solid rock. Unprompted, the woman asked me and two nearby photographers if we were ok with her stepping into the shot. She apparently wanted to take in the view and told us she was not afraid of heights. Truthfully we had no right to refuse; it’s public land and we had no more claim to it than anyone else. She was considerate and savvy – even volunteering to borrow a red jacket from someone to “pop” a bit more in the photo. After about two nail-biting minutes (for us, not her, apparently), she returned safely from the ledge to more stable ground, leaving three photographers with greatly improved landscape images. 


Our eyes play tricks on us underwater, and in the featureless open ocean, there is no way to understand scale. This is illustrated brilliantly in Disney’s “Finding Nemo” in the scene where a distant shadow resembles a small fish (“hey little fella”) but later emerges as a giant baleen whale.

The author meets the world’s largest fish (Photo: Zero Lee)

Using a diver in your image instantly provides a subconscious tape measure to the viewer as you’ll observe in these two examples. The shipwreck image was planned: my dive buddy and I discussed the photoshoot prior to entering the water. He swam out near the ship and I directed him into position. Although the photo was captured using only natural light, the flashlight is a nice gimmick and adds a sense of exploration to the scene. The second image was a happy accident: I am actually the diver who appears unknowingly in the shot alongside an adult whale shark. My friend captured this moment in the Galapagos Islands which perfectly demonstrates the massive size of the ocean’s largest fish.


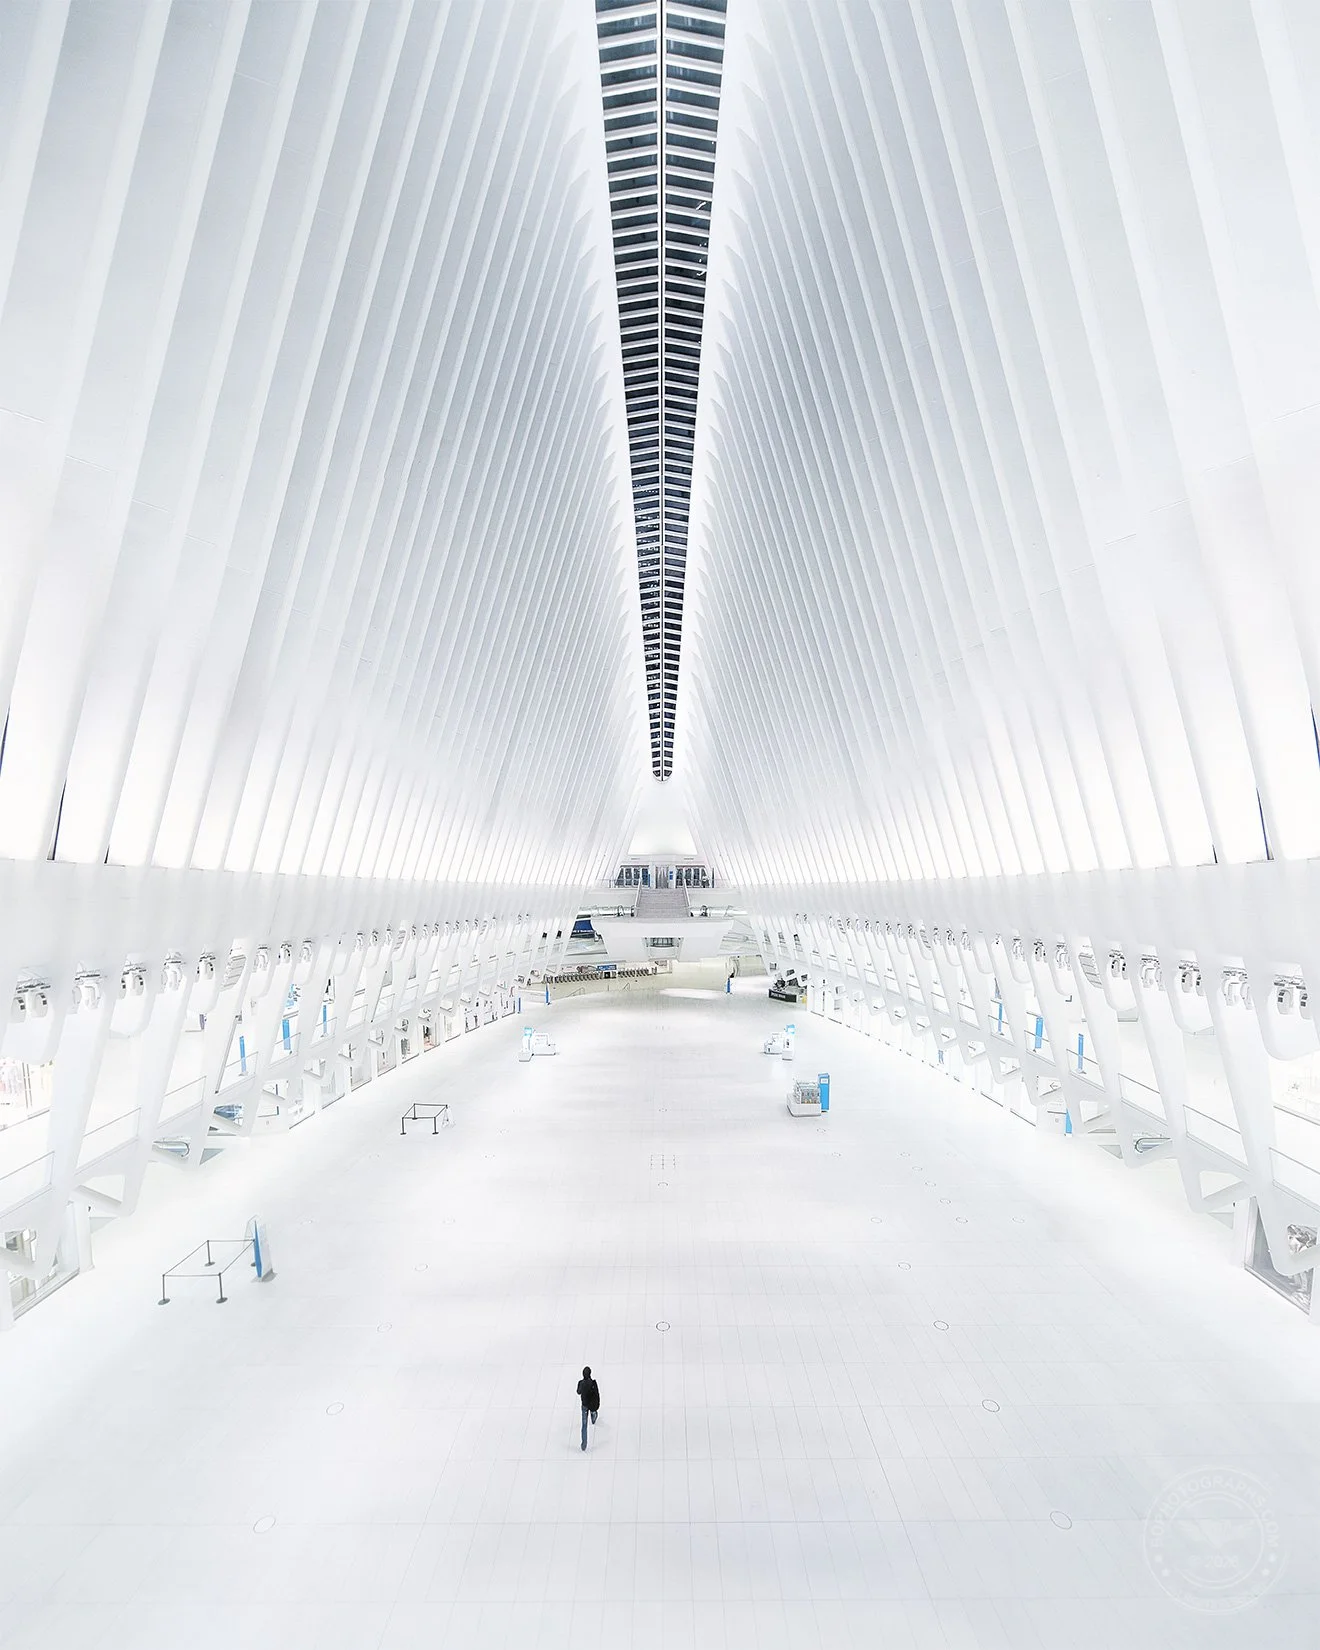
In New York City it is almost impossible to photograph locations without people, and lots of them. This shot of the Oculus was photographed late at night in the days before COVID shut down much of the city. Photographers who have been to this location know even the widest lens struggles to fully encapture the cavernous structure; I achieved this with a stitched panorama of hand held shots using a tilt-shift lens. The single person is real and was unplanned. I have yet to see this location as empty as it was that night. 


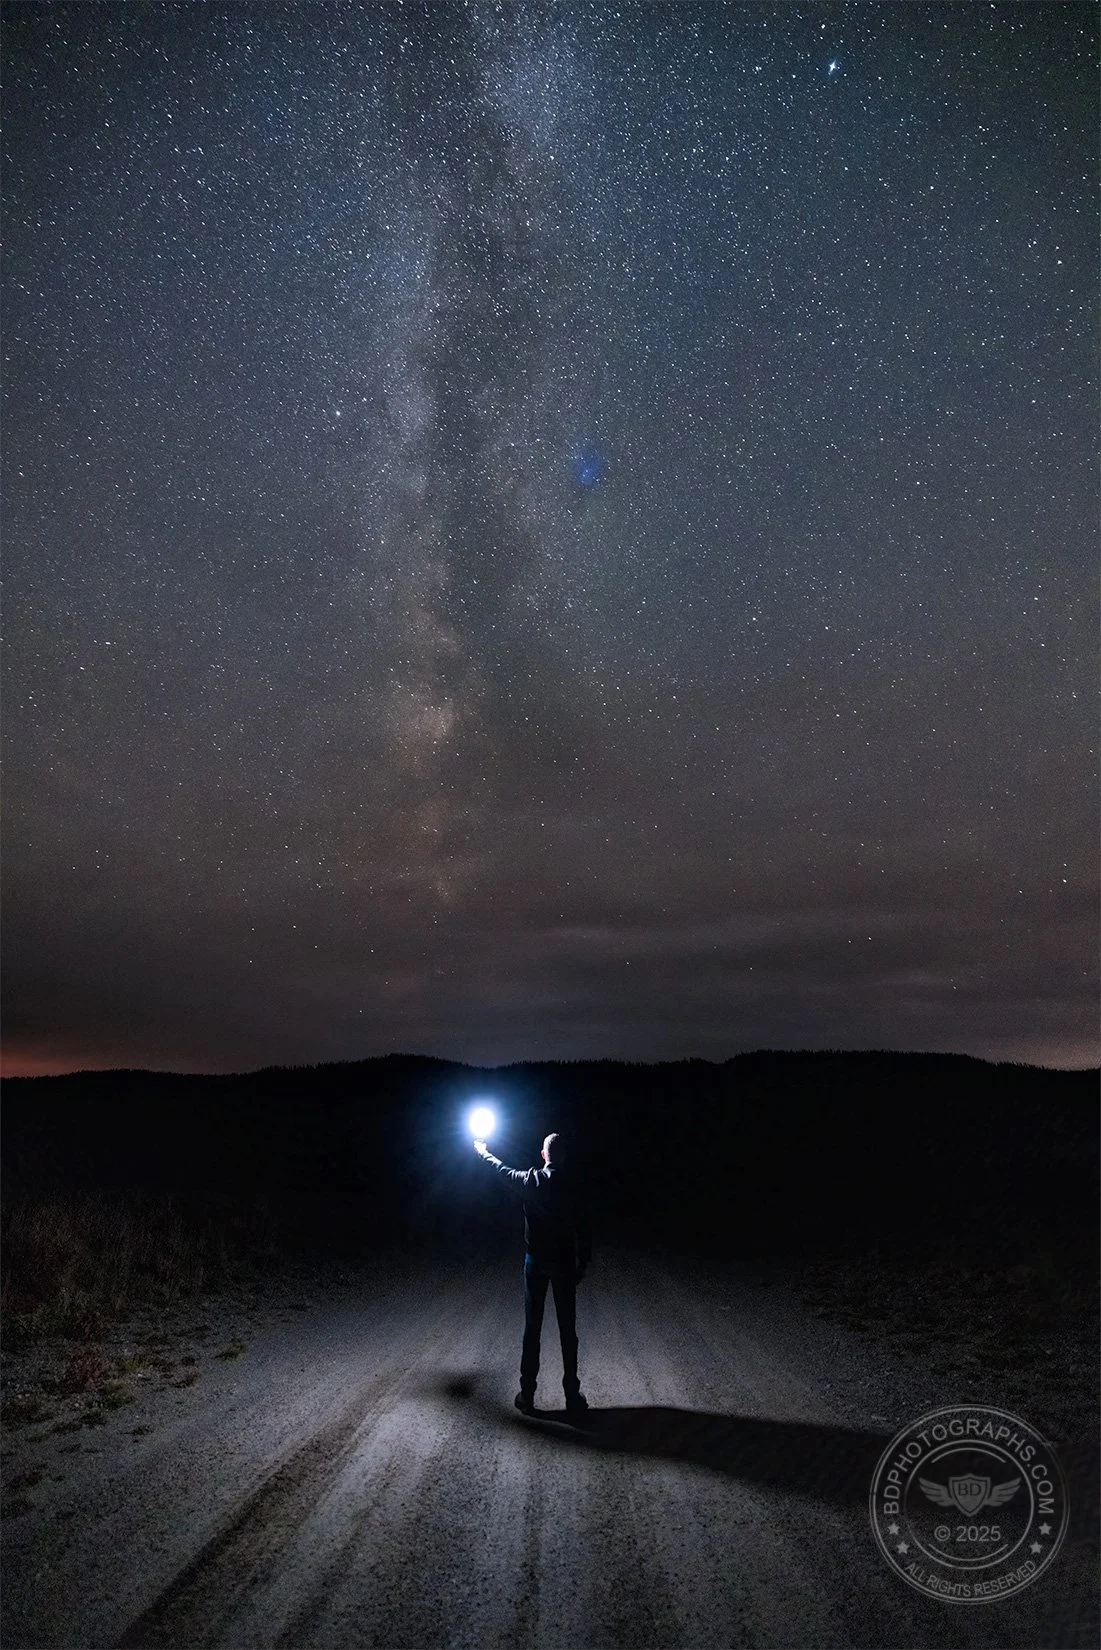
Sometimes including a person in an image is a last-ditch effort to salvage a shot. In this late season Milky Way photo, I planned a shot with a dirt road that aligned cleanly with the Milky Way in the dark Wyoming sky. Miles from anywhere, I had few foreground options so decided to step into the shot myself holding an off-camera flash. The addition of artificial light also helped to light the road and give the shot some depth. I especially like the tire tracks as leading lines: simple but effective. While not portfolio quality, this image turned out to be a fun, albeit cliche, nighttime shot.


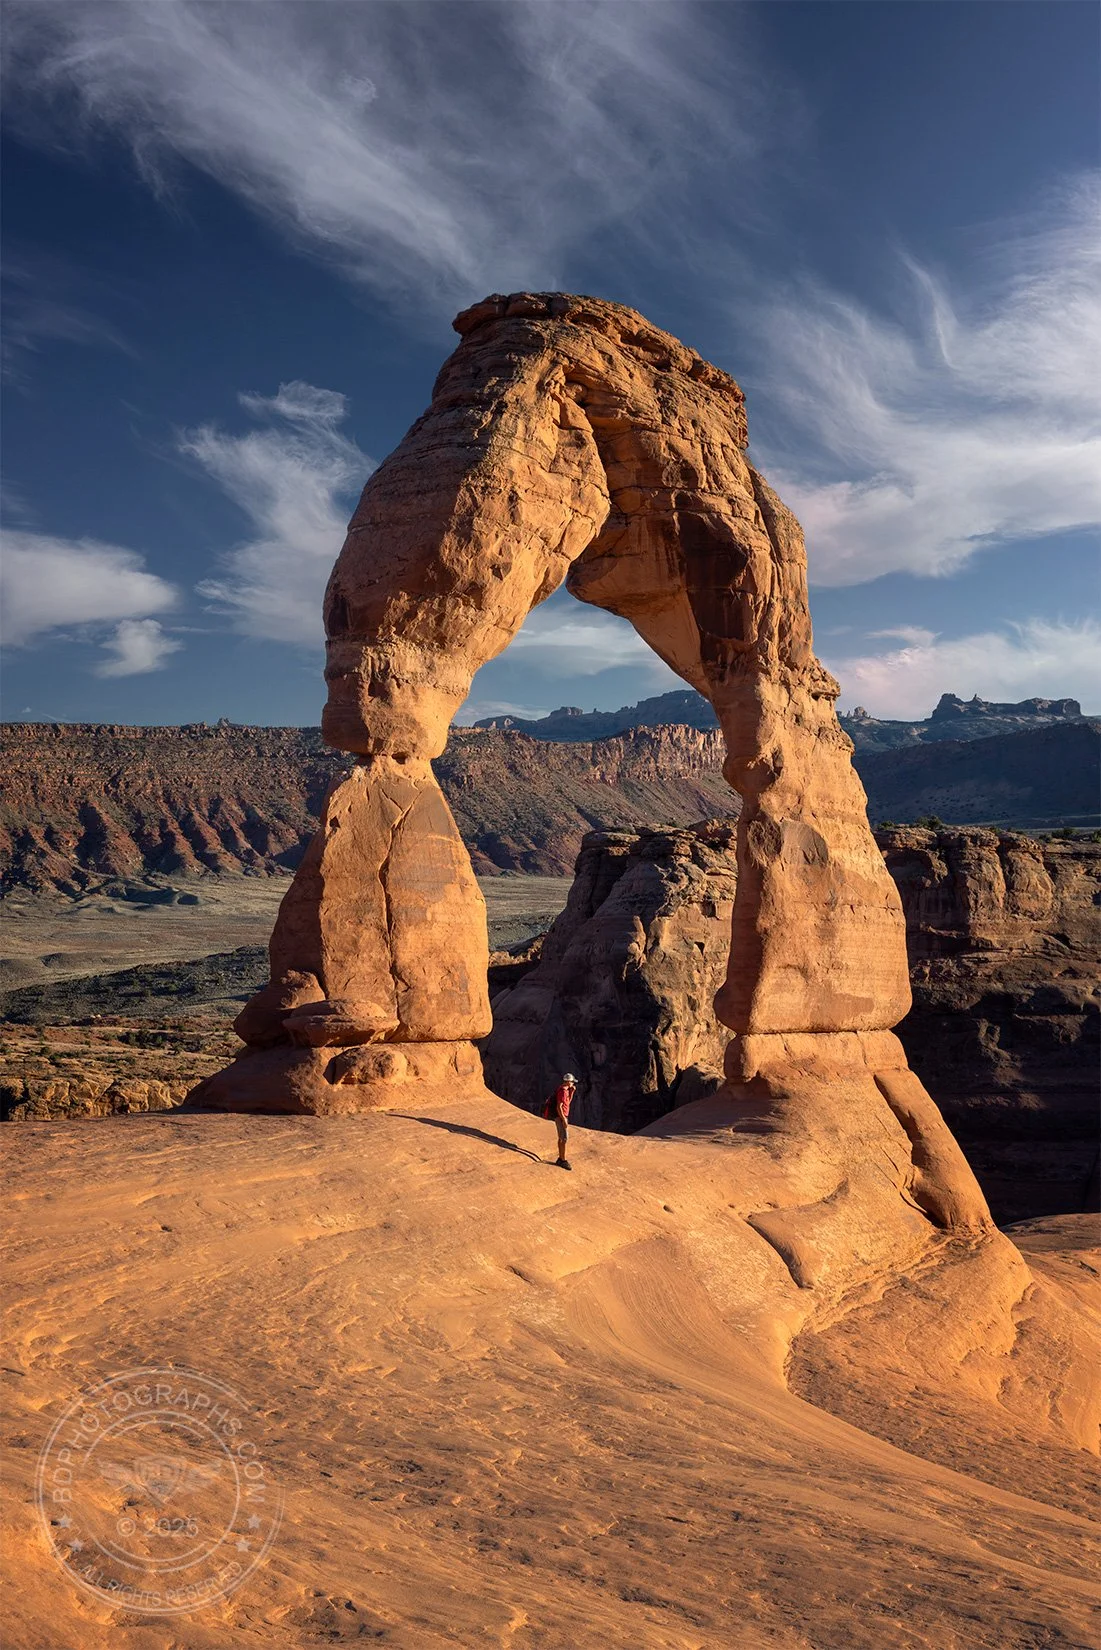
Arches National Park has been photographed countless times and I knew a sunset shot at Delicate Arch would not be groundbreaking, even with a spectacular sky. With mostly clear weather in the forecast, I expected an underwhelming sunset and instead opted for a golden hour shot of the park’s most famous “small” arch bathed in soft light – also not original, but more interesting to me than a dull sunset. Like some other famous landmarks, the height of Delicate Arch is difficult to discern without a frame of reference. When I saw the long shadow cast by a hiker who stepped into frame, I instantly fired off several shots. Not only was the light flattering, the image now clearly showed the height of the arch. Most viewers of this image react the same way: “I had no idea it was so tall”. 


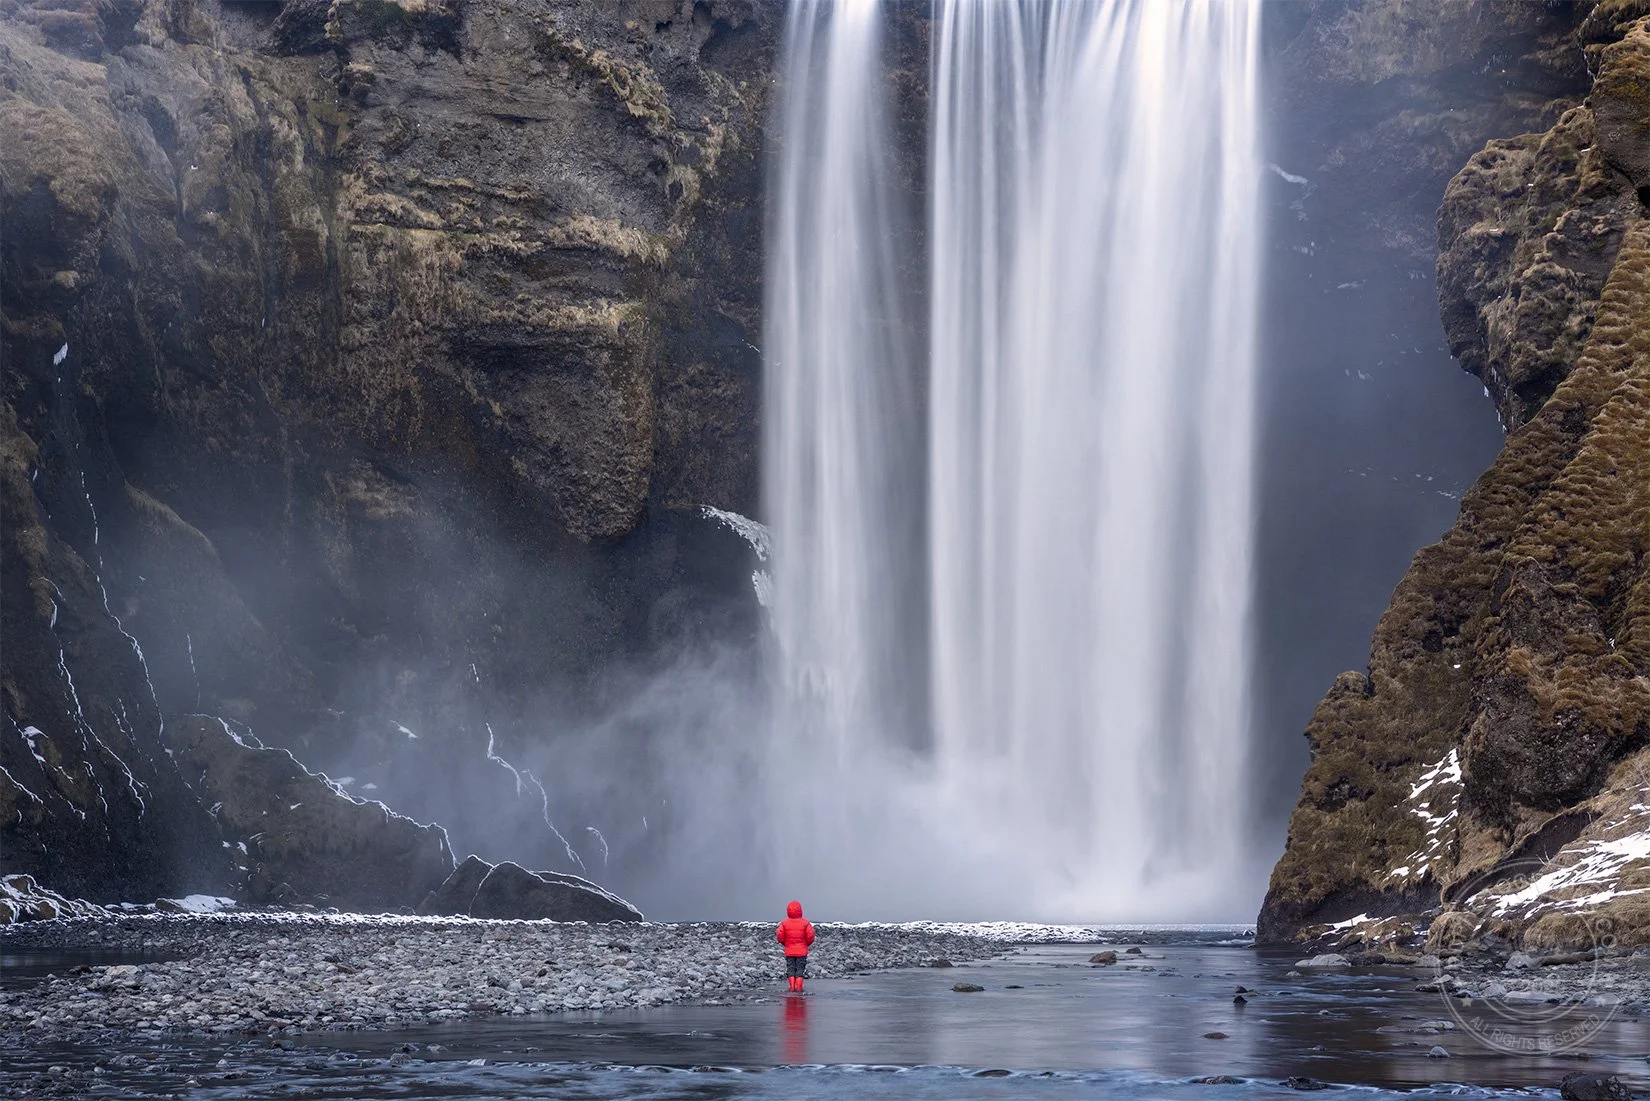
Like my photoshoot at Arches, another failed sunset inspired me to capture this image of Iceland’s famous Skógafoss. Clear skies over the falls did not bode well for a colorful scene, so I took a different approach: instead of forcing a wide and uncooperative sunset shot, I tightened the composition and zoomed in on the powerful waterfall. I intended to be my own subject and walk into the shot with a timed exposure, but to my surprise, a woman walked into my frame of view unannounced, unplanned, but very welcome for a few reasons: 1) the red parka provided a vivid contrast to the brown and gray earth-tones, 2) she happened to be small in stature, making the falls look even more impressive, and 3) she stood perfectly still, taking in the falls in a contemplative moment. 


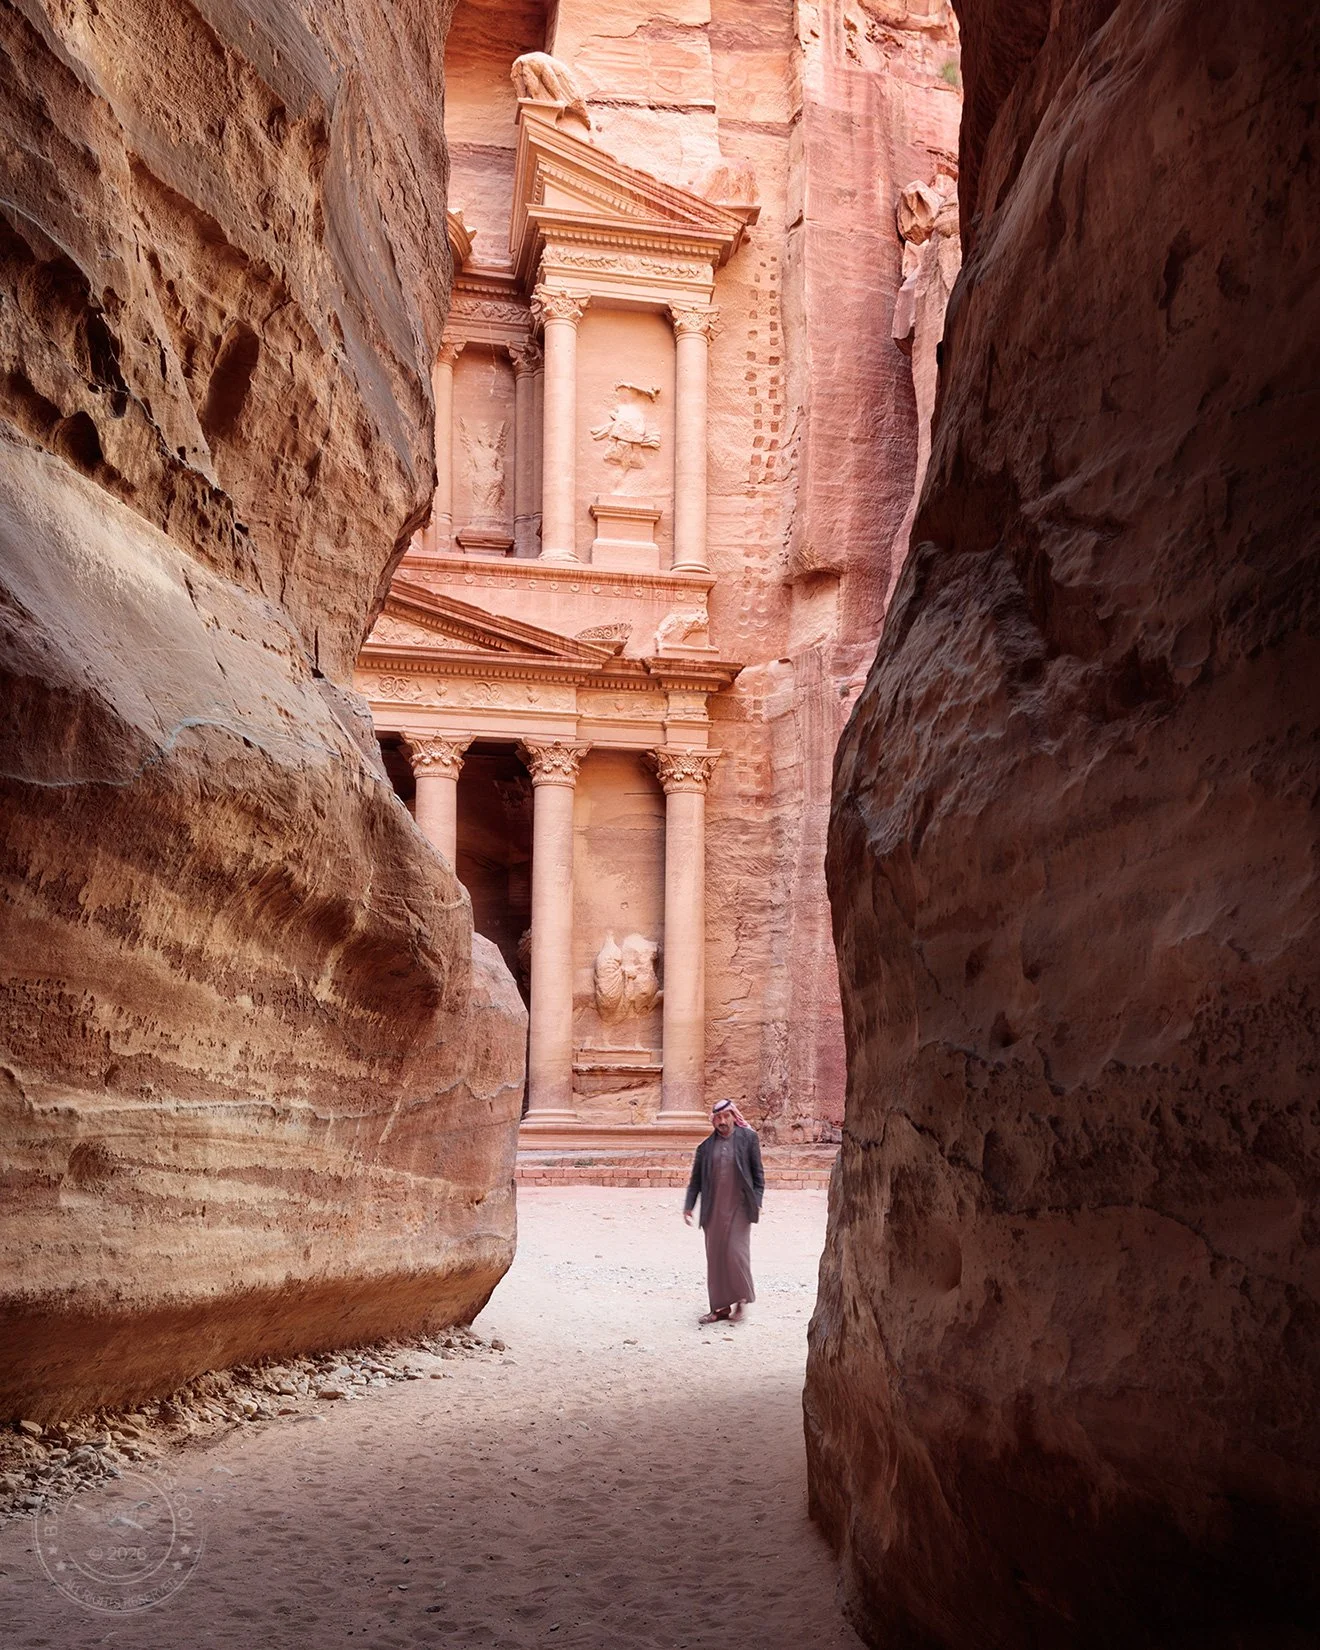
People can do more than provide a benchmark for scale — they can also give a sense of place. A person dressed according to local custom, or one engaging in a unique activity can profoundly affect the viewer’s understanding of an image. In this example, a Jordanian man emerges from behind a canyon wall in Petra. I was already a shooting the great reveal for a few moments when he stepped into frame. If I had known he was going to enter the shot, I would have bumped up my shutter speed and ISO to get him just a bit sharper. Nonetheless, the impact is obvious and his appearance significantly improves the photo. 


Each of these examples should convince you that sometimes people in your photos can make scenes even more impressive. In some of the images a person entered the scene unplanned but fortuitously. In others, the person was included purposefully – even directed – to enhance the image. And for those times when we want to exclude a person, there’s always Photoshop.


Post script: Many photo competitions disqualify images that include people when they are submitted as landscape or wildlife entries. The travel category is usually more forgiving. If you shoot with the goal of entering a photo contest, keep this in mind. 

Introducing SILVERPRINT

I’ve long resisted black and white photography for a number of reasons — not least of which is its frequent use as a cop out for badly lit color images (in fact, I’ve got 10 tips for shooting in bad light, and going black and white is not one of them). More recently I’ve started to embrace black and white in limited applications. Much of my work features nature’s bold, rich colors, but occasionally I’ve shot scenes in which color is secondary to contrast and texture. I’m also a fan of classic Hitchcock films and something of a history buff (it was my major in college), and therefore have an appreciation for the unique mystery and mood found in black and white images. 

My newest gallery, Silverprint, is a nod to these influences and features a handful of black and white favorites. Subject matter is eclectic featuring a mix of landscapes, street photos, and some quirkier items. As always, I welcome your feedback. I hope you enjoy this new set!

The Secret to Magical Forest Scenes

As a rule I do not use many filters in my photography. I prefer to capture the image as neutrally as possible and to make adjustments as needed in post processing. While I don’t use filters at all in my underwater or wildlife photography, I occasionally find them useful in landscapes. One of my favorites that I do carry is a circular polarizer, which we’re going to see in action today. The circular polarizer is a physical piece of glass that screws into the threads in front of the lens. The filter is rotated to achieve the desired amount of polarization. Just like polarized sunglasses, a circular polarizer cuts down glare and improves clarity. If you’ve ever worn polarized sunglasses while skiing or fishing, you’ve seen firsthand the significant difference in the optics. Unlike some other physical filters, such as variable neutral density filters, the effect of a circular polarizer is difficult to achieve using photoshop or other editing software. And the results are quite dramatic!

These two images are from a trip to Olympic National Park and the temperate rainforests of Washington state. I used my Canon EOS R5 camera with a 24-70mm F/2.8 lens. The photos were captured less than 30 seconds apart — one with no filter and the second with full polarization. Same shutter speed, same aperture, and minor difference in ISO as full polarization also darkens the image and requires slightly greater exposure settings. I think you’ll agree the resulting images look very different:

The polarized image has greater color saturation and dramatically less glare in certain areas (see the circled areas in both images below). The unfiltered image has more contrast but appears “crunchier” with harsher highlights in the trees, branches, and rocks. 

Forest and waterfall scenes are some of my favorite places to use a polarizer for its softening effect and painted look. Which image do you prefer? 

Giving Your Photo A Second Chance

If there ever were an example of why it is so important to shoot RAW in photography, this photo is the standard, at least in my library of images. There are many good reasons to opt for RAW format, not least of which is the opportunity to save a photo when it wasn’t captured ideally in-camera. If you’re unfamiliar, RAW format is a data-rich, uncompressed, and unprocessed capture of image information from the camera sensor which enables significant control over detail in post-processing.

This image was shot about 35 feet underwater with my Canon 5DSR and a 16-35mm F4 wide angle lens. During the dive I was having some issues with my strobes — they would misfire and occasionally not fire at all. To complicate matters, there was a strong current throughout the dive so I had to ensure I did not fixate on my camera and risk separating from my dive buddy and the rest of the group. While attempting to troubleshoot I drifted into this school of bannerfish and quickly snapped a few photos. The strobes did not fire so I assumed these would be throwaway images and that I would not be able to restore much color outside the deep blue cast. 

A couple of years later, I revisited the RAW file to see if I could get a decent edit out of it. The moderately shallow depth of the dive meant that at least some of the color was preserved by natural light, so I began to adjust the white balance, saturation, and contrast accordingly. 

Unedited RAW image

Edited for color and contrast

I’m quite happy with the final image and the richness of color, even if it doesn’t qualify to be portfolio shot. Look for an upcoming video where I’ll detail how I edited this and a few other underwater shots. In the meantime, if you’d like to learn about underwater photography, check out some of my videos on YouTube.

Silky Smooth Water Effect

Prerequisites:

Understanding the exposure triangle

Experience in ‘Manual’ mode

You can see it in fine art photographs everywhere: a smooth, dreamy quality to a body of water. Unlike the harsh and crunchy appearance of most smartphone snapshots, the water in these fine art images takes on a fantasy-like artistic look. How do photographers get that magical silky effect? It’s actually quite simple: with a medium to long exposure, we can blur the movement of the water into a velvety texture. Today we’ll look at how exactly to “soften” moving water: the gear needed to pull off the shot, just how “long” the exposure needs to be in different situations, and some side effects and pitfalls to avoid in the process. 

The East River in New York City is tidal and always moving, even on the calmest day. Softening the water requires a long exposure of 15 seconds or more. Notice the blurring effect the long exposure has on the moving clouds. Canon 5D III | EF 24-70 f…

The East River in New York City is tidal and always moving, even on the calmest day. Softening the water requires a long exposure of 15 seconds or more. Notice the blurring effect the long exposure has on the moving clouds. Canon 5D III | EF 24-70 f/2.8L II | Aperture f/16 | Shutter 60” | ISO 100

GEAR

The technique to soften water is in controlling the shutter speed and the most important item aside from your camera and lens is a sturdy tripod. You may also want to bring a polarizer and a neutral density filter, especially for daytime shots. A remote shutter trigger is a convenient tool and a back-saving device when your camera is positioned low to the ground. Finally, a rain cover for your camera is good idea when shooting by water — especially near waterfalls or breaking waves. 

HOW LONG IS “LONG”? 

Sure, we know the trick to softening water is in a slow shutter speed and long exposure but what exactly do we mean by “long”? That answer really depends on a number of variables, but as a rule of thumb, any shutter speed that is too slow for a hand-held in-focus shot can be considered a long exposure. I can see some of you rolling your eyes — “just give me a number!” — so for the sake of simplicity let’s say 1/15 of a second up to 1 second is a medium length exposure, and anything over 1 second is “long”. 


“That’s quite a range” (another eye roll) — it sure is, and there’s a certain amount of experimentation needed to arrive at the optimal shutter speed for a given shot. It’s also the case that two exposures of the same scene can look quite different even at the same shutter speed.

TECHNIQUE

A good tripod is essential to pulling this off, so ensure your camera is mounted and stable before you begin. Put your camera in manual mode and set the aperture to a narrow f-stop such as f/16 or f/22. Set your ISO to its lowest native setting (100 for most Canon cameras; 64, 100, or 160 for different Nikon bodies). Evaluate how fast the water is moving relative to the camera and dial in a shutter speed of a few seconds to start. Look at your exposure meter — if the scene is underexposed, you can open the aperture a bit wider or increase the ISO. If the scene is overexposed, shorten the shutter time a bit. In bright daytime scenes it may be necessary to use a neutral density filter in order to achieve the desired shutter speed. Adjust the shutter speed until the water is softened to taste. Take several exposures and choose the best one.

The “crunchy” water look is typical of smartphones and cameras in Automatic mode. The camera is shooting with a fast shutter speed in order to ensure a sharp image — which is the right thing to do in most situations. It doesn’t know we want an artis…

The “crunchy” water look is typical of smartphones and cameras in Automatic mode. The camera is shooting with a fast shutter speed in order to ensure a sharp image — which is the right thing to do in most situations. It doesn’t know we want an artistic effect in the water. Sony QX100 with iPhone | Aperture f/4 | Shutter 1/640 | ISO 160

The key to softening water is to understand how quickly the water is moving relative to your point of view. When the relative movement is fast, you don’t need as long of an exposure because you capture more movement (and thus blur) in a given amount of time. When the water movement is slow, a longer shutter speed is required to smooth out the texture. Be careful to consider the relative movement of the water, not the objective speed. For example, a moderately flowing stream might be visually quite rapid if you position the camera low and close to the water. In other words, the water moves across the frame quickly. On the other hand, a lake in the background of the image could be churning in the wind, but because of it’s distance, the water is not moving much at all relative to your point of view. This would require a lengthier exposure. 

Fibrous streaks are a variation of softened water. In this image the camera is positioned on the bank low and just inches from the gushing stream. A modest shutter speed of 1/5 of a second is all it takes to achieve the silky tendrils in the image. …

Fibrous streaks are a variation of softened water. In this image the camera is positioned on the bank low and just inches from the gushing stream. A modest shutter speed of 1/5 of a second is all it takes to achieve the silky tendrils in the image. A CPL filter (aka circular polarizer) will help to reduce the reflective glare on wet rocks. Canon 5DSR | EF 24-70 f/2.8L II | Aperture f/22 | Shutter 1/5” | ISO 100 | B&W Circular Polarizer

Sometimes we prefer a more fibrous look to the water, especially in rapids and waterfalls. The recipe for this effect is still in the shutter speed, but in this case longer is not necessarily better. You want to blur the water just enough to soften the crunchy look at you would achieve with a fast shutter speed. A medium shutter speed — somewhere between 1/15 and 1 second will usually produce this effect. 

Less is more: a long exposure will turn the stream into a milky mess and potentially blow out the highlights. This image was shot with a 1 second exposure — not especially long — and has already exceeded the ideal shutter speed. The mill is well exp…

Less is more: a long exposure will turn the stream into a milky mess and potentially blow out the highlights. This image was shot with a 1 second exposure — not especially long — and has already exceeded the ideal shutter speed. The mill is well exposed but the water is too frothy and some of the trees in the background show motion blur. Sony A7RII | 24-70mm f/4 | Aperture f/22 | Shutter 1” | ISO 100

SIDE EFFECTS

Long exposures can sometimes result in odd or undesirable effects in images. Remember that a long exposure will create motion blur — this is how we soften water — and that blur will affect any moving object in the image. On a windy day bushes and trees will sway, along with flags, traffic lights, boats, and even skyscrapers! Moving cars will appear as streaks of white and red when their lights are on. And clouds will lose their shape and become foggy strokes of whitish gray (sometimes this adds to the dreamy effect we achieve in softened water). There is a relatively easy way to control these unwanted effects, but it requires some work in post processing. First take the photo at the desired shutter speed to properly soften the water. Then, take a second photo with a much faster shutter speed (you will have to increase your ISO and/or widen your aperture) to ensure there is no unwanted blur in the trees / boats / moving items. Combine the two images in post processing. 

Remember that softening water is an artistic technique that deliberately stretches the shutter speed. Have fun experimenting and soon you’ll enjoy the pleasing and professional looking images you create.