The Northern Lights

Note: In this post I use the terms “aurora”, “aurora borealis”, “northern lights”, and “the lights” interchangeably. 

The northern lights have been on my shortlist for years and this winter I finally visited the Arctic Circle to photograph them. It’s not for lack of trying: previous attempts in Alaska and Canada were uninspired at best due to low clouds and faint auroras — though in fairness both were outstanding wildlife trips where the northern lights were sought after as a bonus, so I can’t really complain too much. 

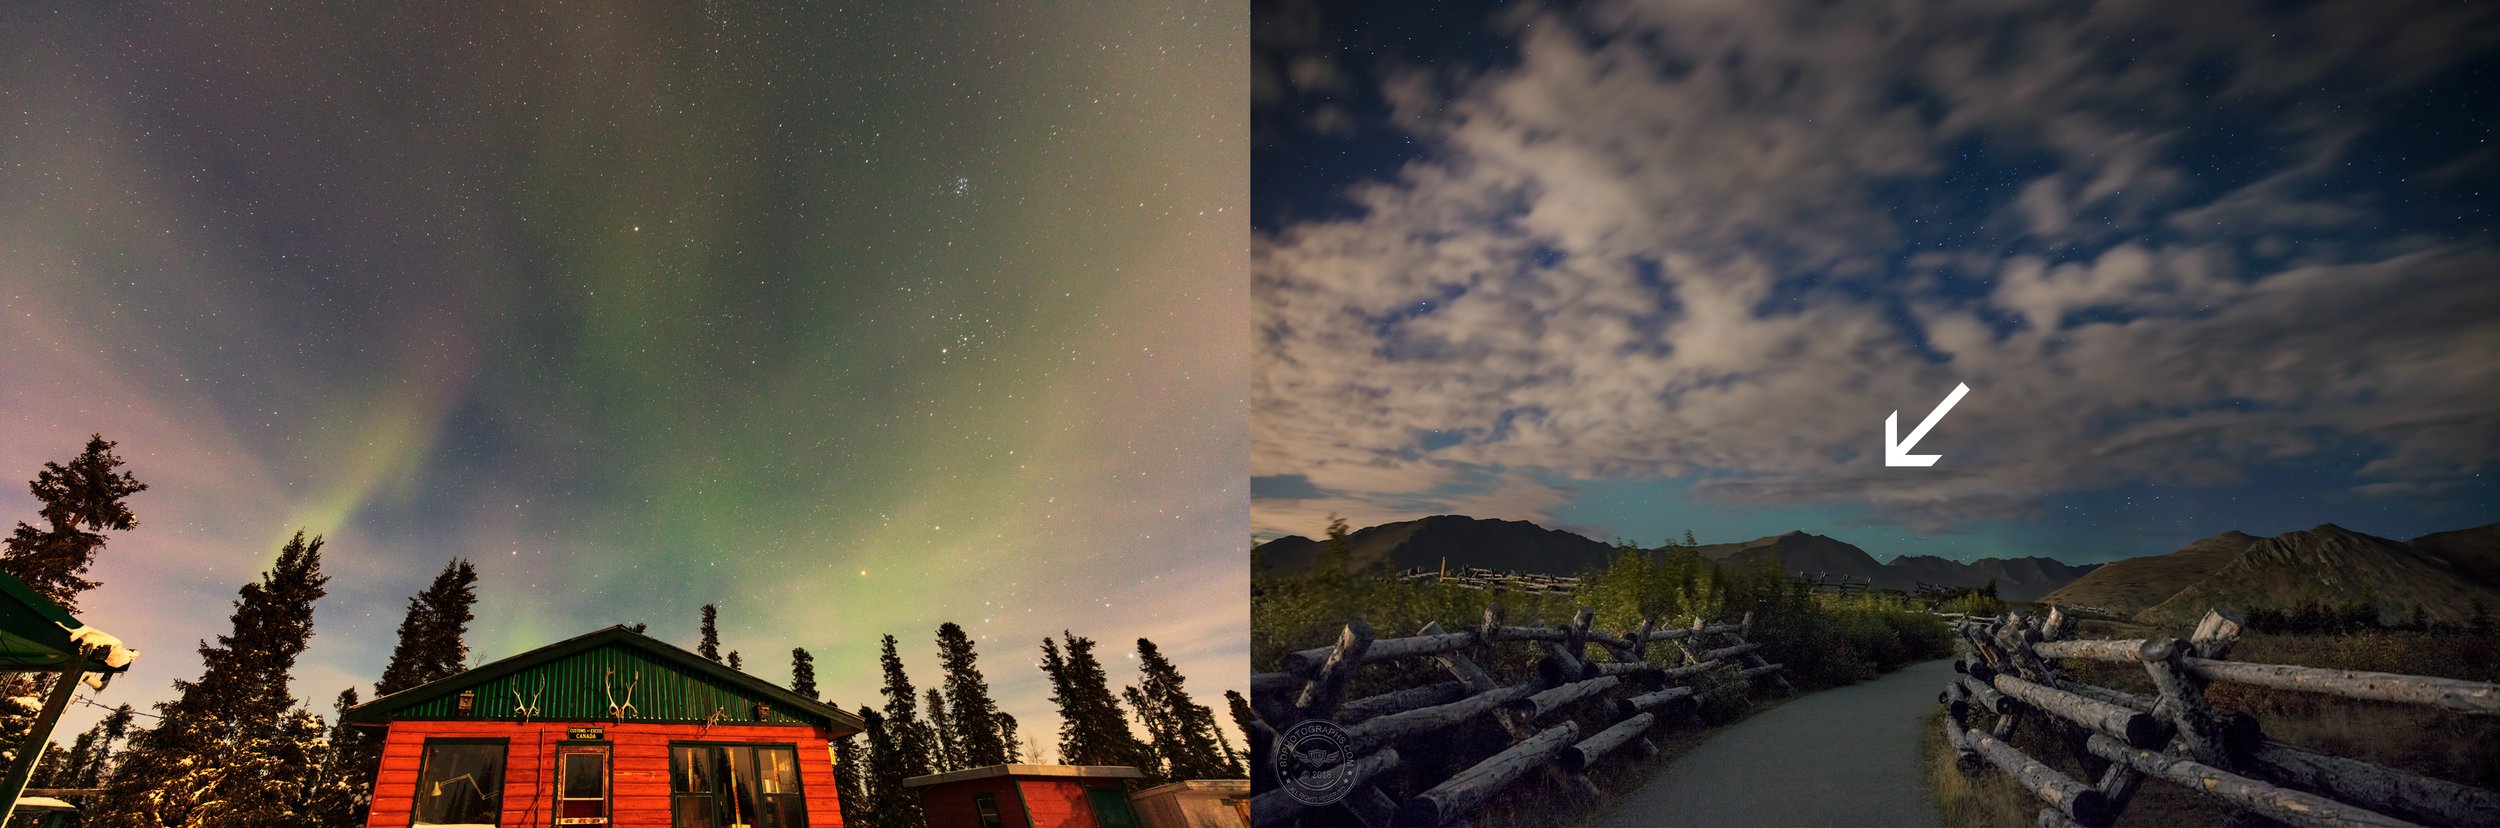
Try again: less-than-amazing attempts to photograph the aurora on previous trips to Canada (L), and Alaska (R) where the faint glow above the horizon barely registers as a sighting!

The aurora borealis, also known as the northern lights, is a natural phenomenon that has captivated people for centuries. The lights occur when charged solar particles collide with the earth’s upper atmosphere. The North and South Poles act like magnets drawing the solar activity to far northern and southern latitudes (the southern lights are known as the aurora australis — more on the scientific explanations here.)

As I was researching locations to observe the northern lights, I weighed the tradeoffs - in particular for Fairbanks, Alaska; Iceland; Yellowknife, Canada; and Lofoten, Norway. (I expect at some point to visit all of them!)

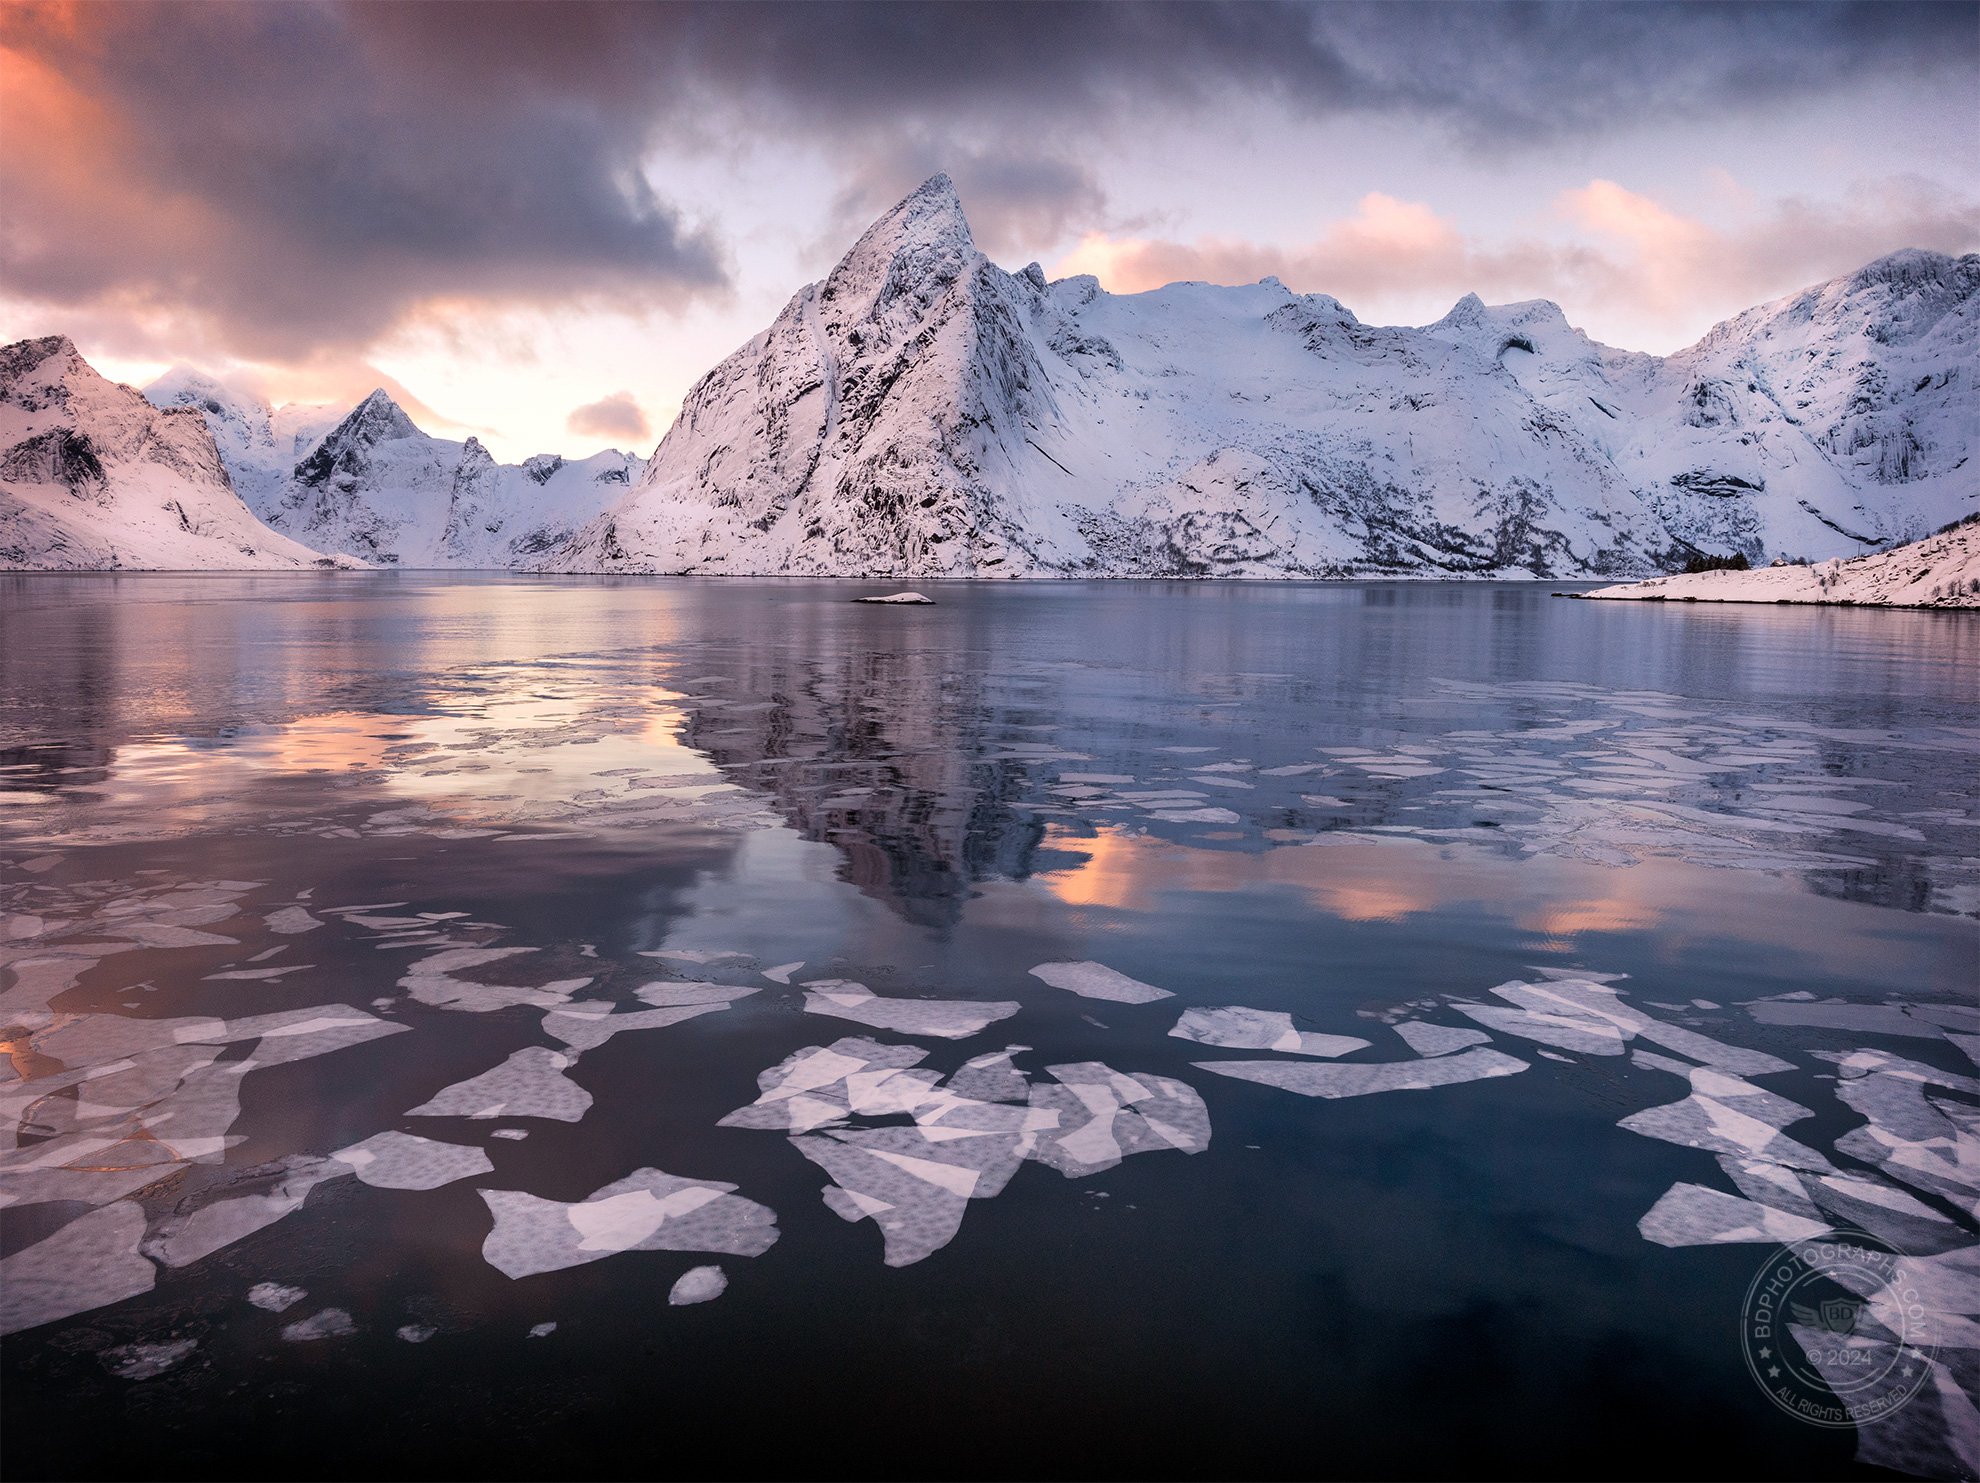
Lofoten has so much natural beauty that it almost guarantees portfolio-level images. This image was captured flying a drone very close to the surface of the water.

Fairbanks has excellent aurora sightings but lacks many photogenic locations otherwise. Iceland, while incredibly scenic, is prone to slightly less favorable weather in winter. Yellowknife, like Fairbanks, is relatively featureless tundra and is arguably the coldest of all the locations. Lofoten is the only location of the lot that is firmly within the Arctic Circle and the micro climates there can lead to more viewing opportunities, though weather is nonetheless unpredictable and dynamic. And like Iceland, Lofoten is visually beautiful so in the event that I did not see the aurora, I would be virtually guaranteed to come home with some great winter landscape photos.

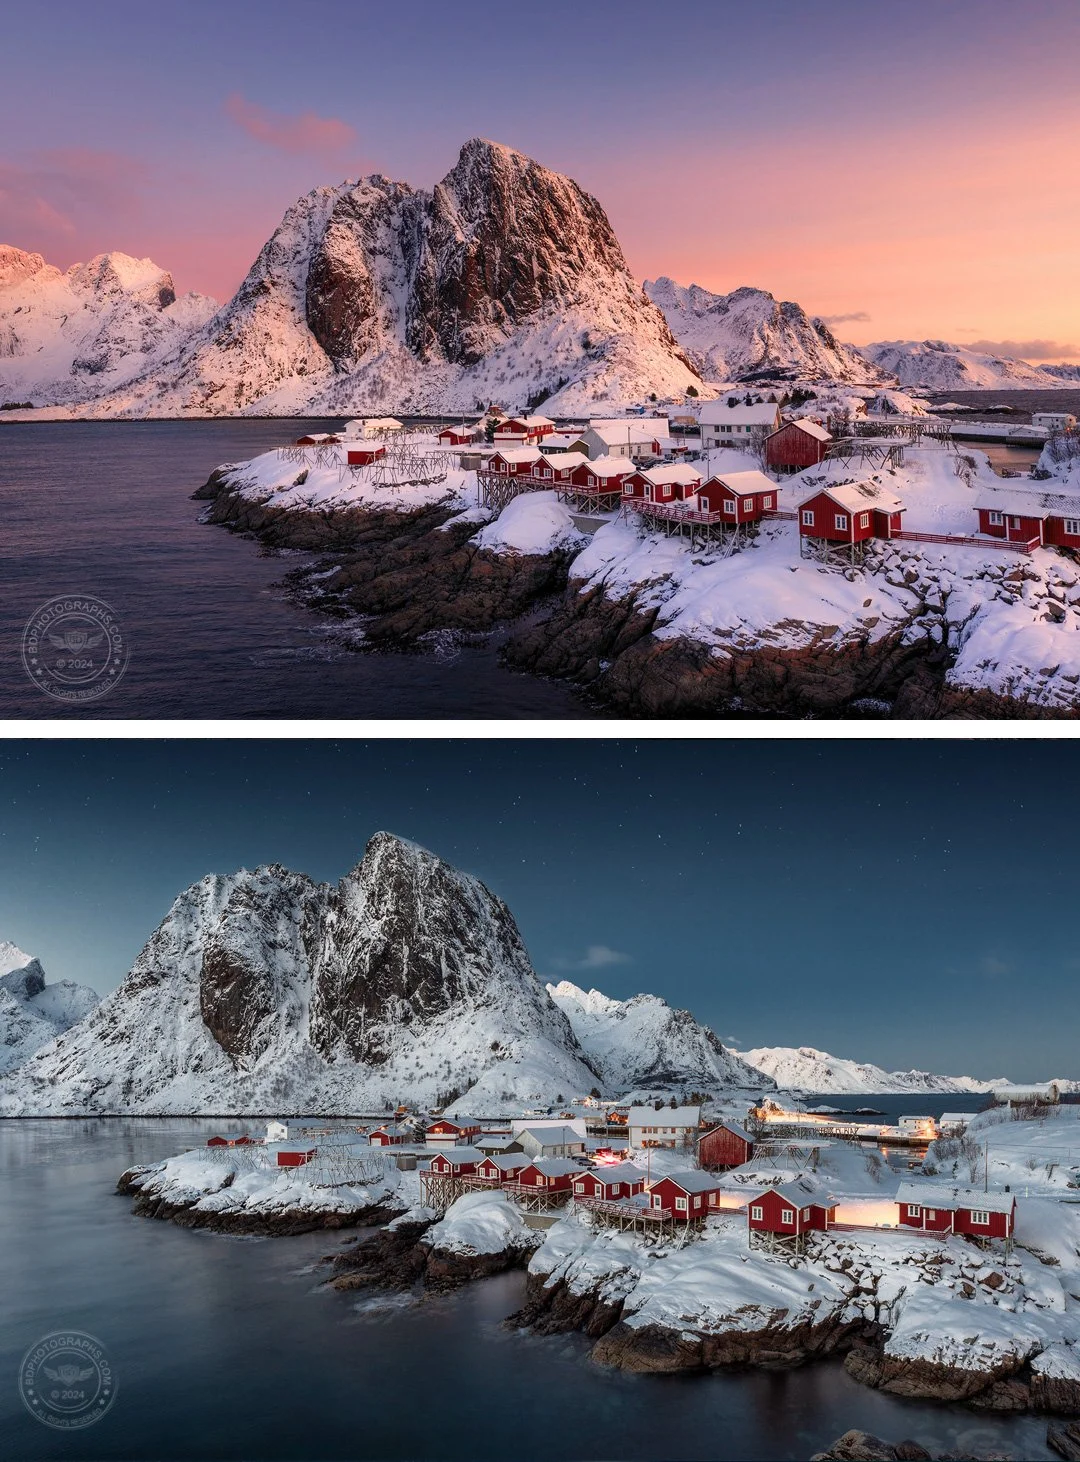
Some locations require visiting in more than one light condition. Above: a fishing village at sunrise and during evening blue hour.

I flew across the Atlantic on a three-flight hop up to Lofoten, descending through a snowstorm, and landing in a complete whiteout. I’ve seen my share of sketchy weather but I’m still not sure how those pilots made the runway. The next morning, recharged with a good night’s sleep and some hot tea, we began our tour of this Arctic wonderland.

Lofoten is an archipelago connected by land bridges in between small fishing villages. Towering fjords frame these tiny hamlets to the east and natural beaches to the west. Weather changes often and sporadically: one morning we left a sunny fishing town into a blizzard on the other side of the mountain. Of course, dynamic weather presents an opportunity in landscape photography and is without question preferred over blue skies.

Lofoten is an archipelago of towering fjords and picturesque seaside fishing villages. Photographic opportunities are everywhere.

Most of the winter imagery that I capture at home is of quaint New England vignettes: a covered bridge, a small church, a waterfall in the snowy forest, etc. One of my goals on this trip was to bring home images of snow-covered landscapes that were quite different from what I photograph at home: icy ocean scenes, Arctic fishing villages, snow-covered fjords, and, of course, the northern lights. 

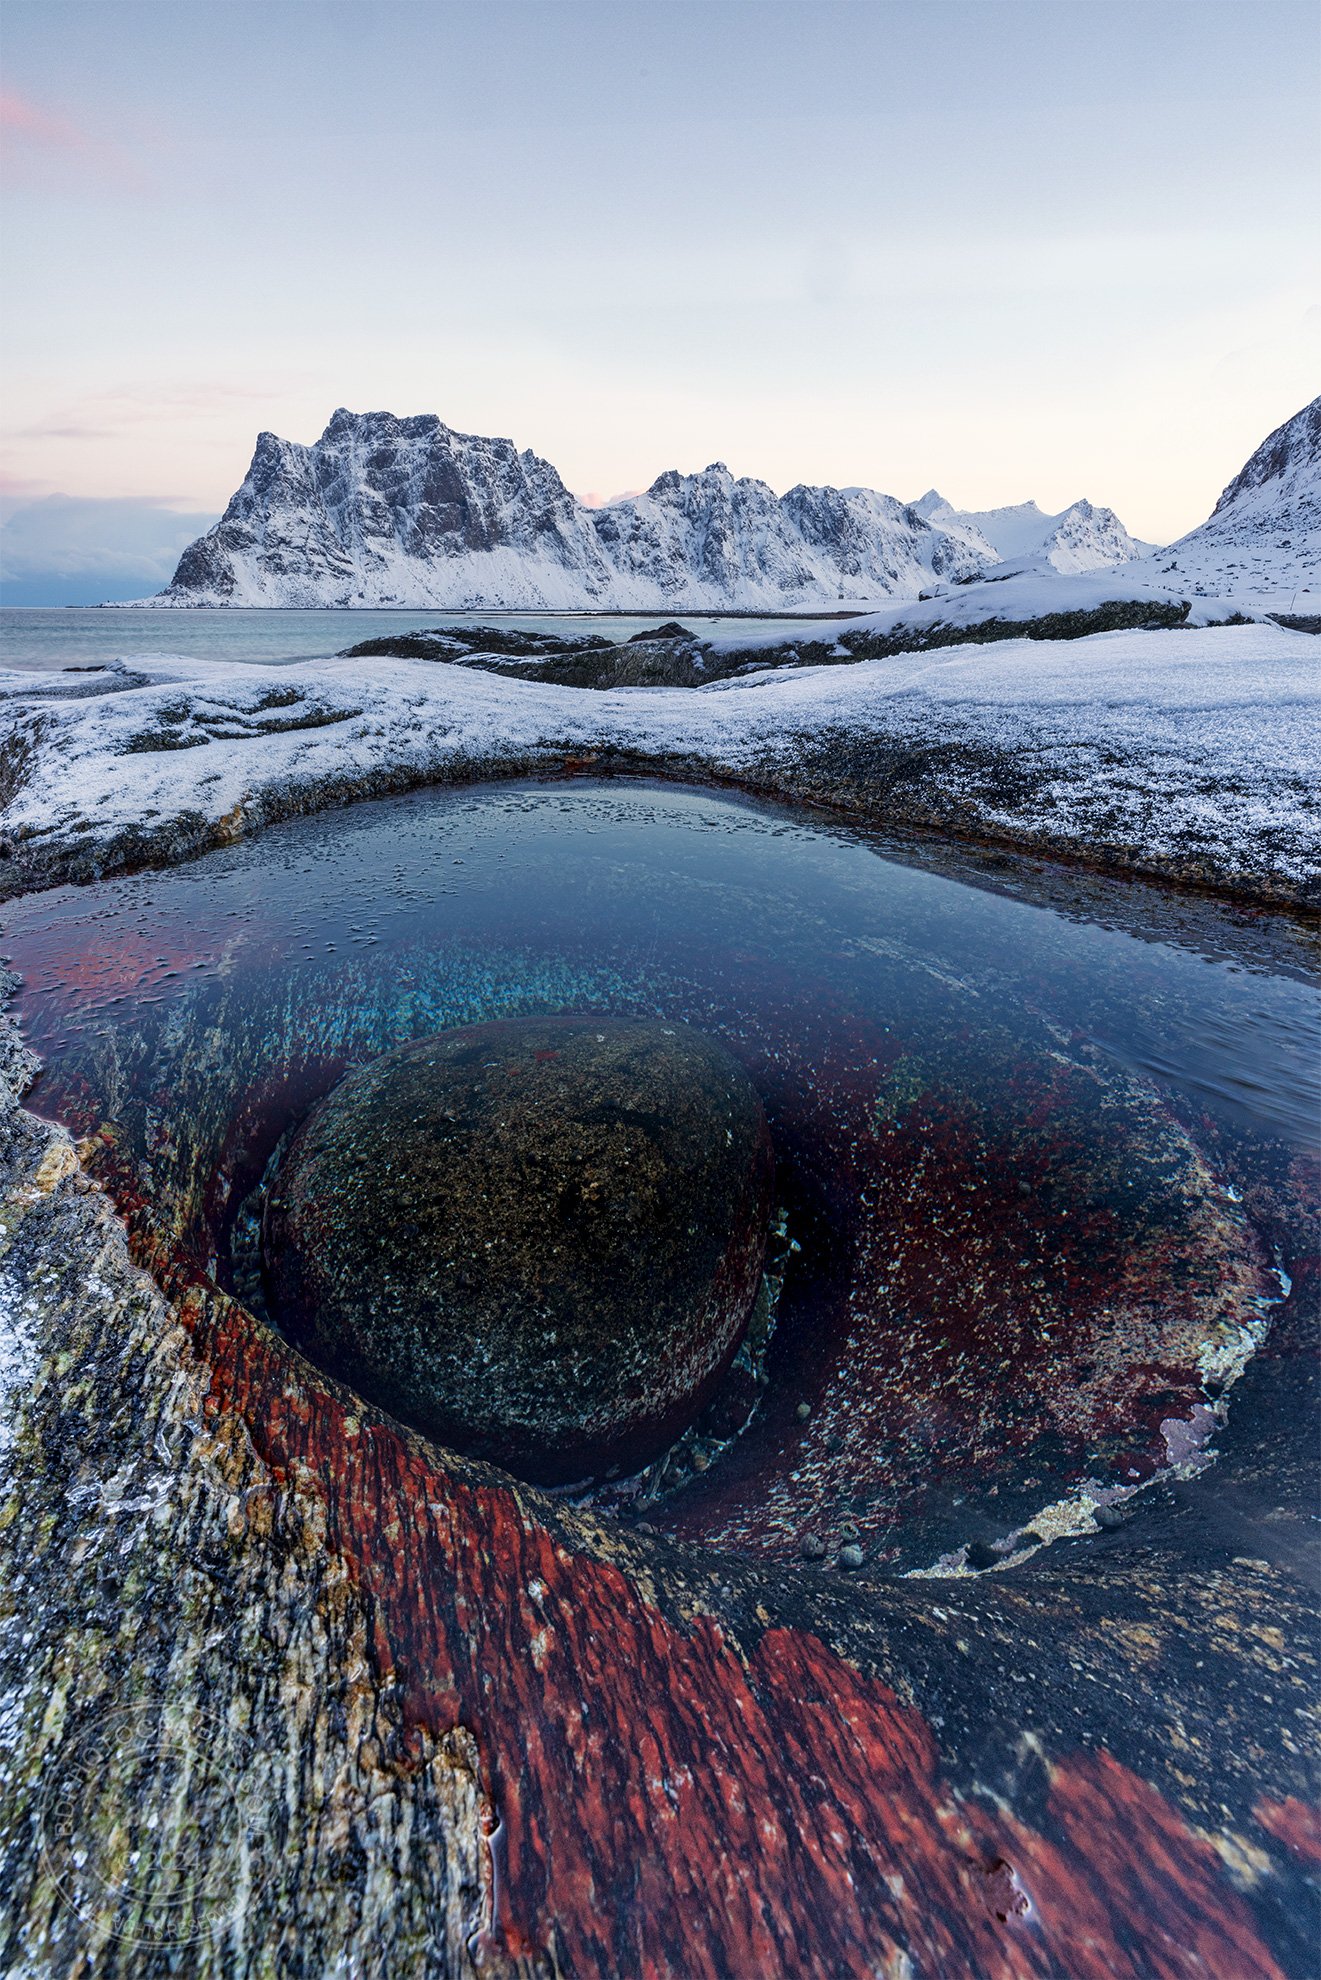
The “Dragon’s Eye”: a colorful tidal pool within a rock basin along an Arctic beach

Foreground elements need not be complicated: A snow-covered bridge creates leading lines toward the subject.

Each day I went out for sunrise and sunset, at times returning to the same locations to capture the same scene in different light conditions. After dinner, I monitored the aurora forecasts and waited for my guide to confirm shooting time if we were to get lucky with a light show. Aurora chasers know that clouds are the enemy, but even on clear nights, we still need good solar activity to see the northern lights.

This makes it very different from Milky Way photography: in the right time of year, all you need is a dark sky location, clear weather, and you are guaranteed to see the Milky Way. (Ok, it’s a bit more nuanced than that: certain latitudes won’t see it, and you need to know what time of night to be out, but for the most part the Milky Way is a slam dunk as long as the weather cooperates. The aurora is much more elusive.)

The afternoon weather was clear and expected to hold overnight. Solar activity forecasts changed suddenly from a KP 2 to a KP 5 (a higher KP indicates a greater probability of seeing the aurora). My aurora forecast app displayed live webcams picking up sightings in Finland and Sweden — things were looking promising. And then, at about 10:30 p.m., the northern lights arrived right where I was waiting for them. I worked with a few different compositions and took time to experiment photographing with my iPhone in addition to my primary camera

This shot required two exposures: one for the northern lights and a second to mute the harsh streetlights in the fishing village

Like other night sky images, the northern lights require a long exposure but there is a point of diminishing returns if the shutter speed is too long. Because the lights are a moving phenomenon, too long of an exposure will result in a cloudy green sky and potentially over-exposed image. I found that the sweet spot was between 6 and 13 seconds depending on what the lights were doing. Aperture generally was left wide open on my Canon EF 16-35 F/2.8L III lens. Of course night sky photography and long exposures require a sturdy tripod and I was quite pleased that even in strong winds my Gitzo carbon fiber tripod provided a stable platform.

In astrophotography, artificial light can become blown out even if the sky is correctly exposed and this was absolutely the case as I photographed the aurora over a fishing village. The trick here is to take at least two exposures: one for the sky and at least one for the village houses in order to mute the strong effect of the streetlights. The raw images are combined in post-processing to create a single image. This is a common technique in landscape photography when there is a high dynamic range of light.

Above: iPhone photo of the arriving aurora. Phone cameras have come a long way!

The portfolio shot: aurora borealis over Norwegian fjords

Aerial shot using a drone. Most drone enthusiasts go for shots from this perspective, but the drone can offer incredible opportunities to shoot anywhere you can’t plant your feet.

Prior to my trip I applied for a European drone license and passed the course to fly legally in most European countries. When the winds were calm, I sent up the drone for some aerial images and footage. One of my favorite photos was achieved flying quite low — just a few feet above the water. Many drone enthusiasts use it too narrowly as a device only for aerial perspectives, but I see it as a tool to take photos anywhere I can’t plant my feet. Today’s drones fold up and fit comfortably in a backpack and some of them like my DJI Mavic 3 are equipped with excellent cameras!

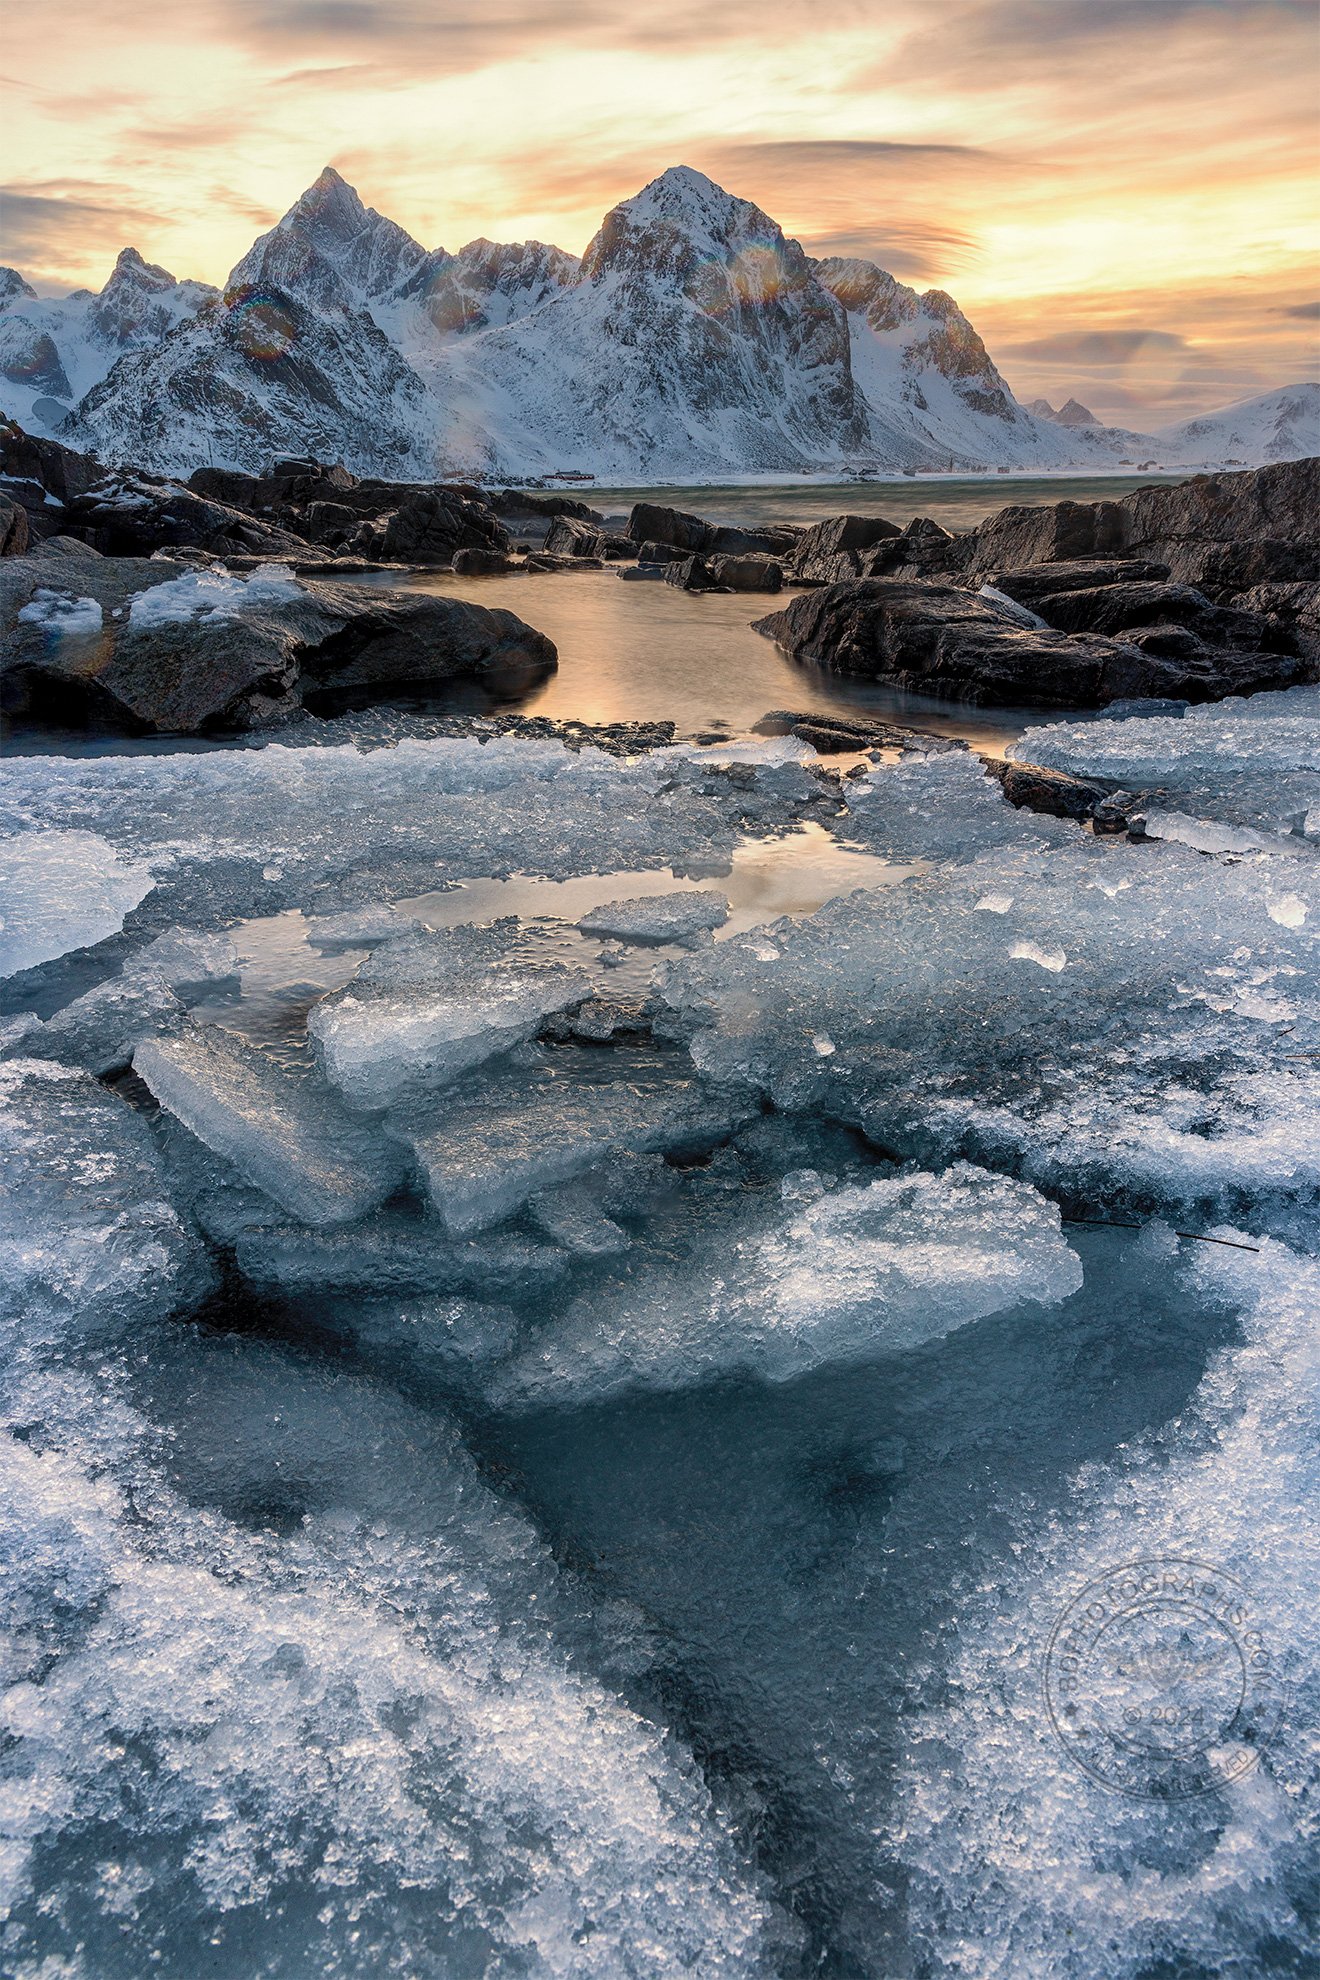
Ice shards and snow melt make compelling foreground subjects. Leading lines and geometric shapes are constantly changing as fresh storms freeze and thaw the shoreline.

In the daylight hours I sought interesting compositions to showcase the Arctic landscape. The snow-draped fjords are stunning by themselves, but adding a good foreground element can take a photo from pleasing to spectacular. It’s easy to overthink the foreground, but a basic subject is all that is needed. Along the beaches I searched for ice shards and geometric shapes. Other times a simple fisherman’s cabin provided a humble contrast to the powerful and majestic mountains. 

As the week developed, the weather grew progressively worse and I realized how lucky I was to see the aurora. And in the weeks after my visit, aurora sightings were scarce and much of the snow gave way to rain, washing away the magical winter essence. Outdoor photography is almost exclusively the domain of natural light and this means surrendering to whatever nature provides on a given day. Though my previous visits to northern latitudes did not yield successful aurora images, persistence and patience paid off: this trip was one for the books.

Tropical oasis? The water color on sunny days resembled the Caribbean.


Return to Little Cayman

I recently returned to Little Cayman on a trip with my home-base dive shop, Atlantis Aquatics. Little Cayman is one of my favorite dive destinations and truly is a showcase of the Caribbean’s greatest hits: sea turtles, groupers, stingrays, nurse sharks, and reef sharks are common sightings, as are smaller critters like spotted drums, sea slugs, “disco” fish, and cleaner shrimp. 

Most people who visit the Cayman Islands stay in Grand Cayman, the largest and most commercialized of the three islands. Just eighty miles east of Grand are the sleepier sister islands of Little Cayman, and 15 miles further, Cayman Brac. They are remote and undeveloped: no corporate hotel chains, Starbucks, or movie theaters here. These destinations are for people who want to scuba dive, fish, or just disconnect. 

Flying to Little Cayman reminds me of travel in the Alaskan bush or the Costa Rican rainforest - small props landing on remote airstrips

Visitors arrive in Little Cayman on a deHavilland Twin Otter— a dual-engine, 18-seat, propeller plane — that departs Grand Cayman and lands thirty minutes later on a tiny airstrip nestled between mangroves and natural coastline. One narrow ring road traces the circumference of the island — you could drive it potentially without seeing any other vehicle traffic. 

For this trip I opted to keep the photography kit relatively simple with a one lens wide-angle setup only: my Canon EF 16-35mm F/4L IS lens on a Canon R5 body. I took it underwater in a Nauticam housing with two Sea & Sea strobes. (All of my gear, incidentally, is purchased at Backscatter — and they have presence teaching underwater photography courses at the dive resort where I stayed on Little Cayman.) Although there is plenty of macro life to see in Little Cayman, I find that diving with a group of divers following a dive guide means we don’t spend much time in any given spot, which makes macro photography difficult. Going with a group of other photographers (or diving with only your buddy) is a much better arrangement for macro photography. (Want to learn more about wide-angle vs. macro photography? Check out this video)

One of my goals on this trip was to seek strong subject separation. I have many photos of turtles and barracuda blending into the reef, so on this trip I was hoping to make them “pop” more distinctly in my images. Too often turtles photographed against a reef are overtaken by the busy background, almost camouflaged into the complex array of corals.

A hawksbill turtle flies over the reef. I like this image because there is subject separation so the turtle really stands out. It also clearly shows action and movement. 

A great barracuda displays its menacing teeth. Once again, there is good subject separation so it does not blend into the reef. This was shot on the edge of one the of many coral fingers 

To achieve subject separation on the reef, the photographer must be lower than the subject and must approach at an upward angle — not easy to do without trampling on the fragile corals, which is of course absolutely forbidden. The trick to this type of shot is to look for subjects near the edge of a slope, coral head, or wall where you can easily dive lower than your subject without touching the reef. 

Another goal was to visit a well-known shipwreck in Cayman Brac. On my last visit to Little Cayman this wasn’t an option, so I was excited when the captain proposed a trip (weather permitting) out to the Brac to dive this wreck. Transit time was about 50 minutes in moderately choppy seas, but the bouncy ride was well worth it. The M/V Keith Tibbets, formerly a Soviet destroyer built for Cuba, rests in clear water on beautiful reflective sand. The shipwreck is extremely photogenic, with its forward turrets clearly visible. It is about 90 feet down to the sand, but divers who don’t want to go deep can explore the shallower starboard side at about 60 feet.  

The M/V Keith Tibbets, formerly a Soviet destroyer built for Cuba, was a highlight of this dive trip

One topic of debate in diving is whether it is permissible to kneel in the sand. Some dive operators allow it as long as it is done with care; others do not permit it and ask divers to remain buoyant above the bottom. On this trip we were asked not to kneel on the bottom so stingray shots were a bit more challenging, but not prohibitively so.

This was my favorite stingray encounter. It’s fairly common to see rays gliding across the sand, or buried on the bottom, I caught this ray in the process of swirling up the sand and digging itself in. 

We had several stingray encounters, and it is remarkable that each ray had its own personality. One was feisty and irritated, more so by the bar jack that was tracing its every movement than any encounters with us. Another was skittish and seemed to take off whenever we got too close. And then there were two others who were very tolerant of our presence, posing in the sand unencumbered even as a group of three of us approached with our cameras. It truly is a pleasure when a subject is cooperative, and it’s no surprise that the best images are achieved when the animal is calm and unbothered by our interactions. 

“Schoolmasters’ Tower” is my favorite image from this trip. Here schoolmaster snapper (Lutjanus apodus) rest in the lee of a coral head. If you look closely you can spot a Bermuda Chub and a squirrelfish tucked in among the snapper.

This is really a snapshot split, meant to document the experience of getting back on the boat. Divers are privileged to see a completely different world underneath the surface

With the exception of south Florida, I rarely revisit dive locations within 5 years — there’s always somewhere new or different to explore before recycling old favorites. Little Cayman is an exception, and will continue to be owing to its reliability as an outstanding Caribbean dive destination. See you again soon!


If you are interested in learning about underwater photography, or experiencing some close-up behind-the-scenes encounters with sharks, dolphins, crocodiles, check out my YouTube channel.

Galápagos Recap

Six years in the making (and postponed by a global pandemic), my trip to the world famous Galápagos Islands finally arrived in 2023. Galápagos is a rare opportunity for a variety of underwater and topside wildlife photography, including endemic species and uniquely famous animals. For underwater photography I shot entirely with a Canon R5 mirrorless body with the EF 16-35mm F/4L IS wide angle lens. The EF F/4L IS is an outstanding lens, even nearly 10 years after its introduction: tack sharpness, minimal distortion, and beautiful detail. A Nauticam housing and two Sea & Sea strobes complete the underwater rig. Topside photography included birds, reptiles, and pinnipeds, so I needed a versatile telephoto lens: the EF 100-400 f/4.5-5.6L IS II, which remains my favorite telephoto zoom lens. Though not the fastest performing glass, it is exquisitely sharp throughout its focal range and is a great hand-held lens for general daytime wildlife photography.

Wolf and Darwin Islands (blue circle) are the primary dive locations and even more remote than the rest of the Galápagos Islands. The main airport is centrally located but still a 16-hour boat ride from the dive sites.

The journey begins with a redeye from New York to Ecuador’s high-elevation capital, Quito, with a connection to Avianca’s flight to Baltra Island, 600 miles off the coast of the mainland. In Baltra I jump on a small inflatable tender (aka “panga” in Latin America) that brings me to the Humboldt Explorer, the live-aboard dive yacht that will become home for the next week. 

One of the unique features of Galápagos is its remoteness and difficulty to visit. Wolf and Darwin Islands, where we will do most of our diving, are uninhabited (by people), undeveloped and significantly distant from our arrival port in Baltra: a sixteen-hour overnight crossing reveals the first glimpse of Wolf on the morning horizon. A towering bluff overlooking the mighty Pacific, Wolf Island truly is a wild place where nature is free and the ocean is powerful. 

The Galápagos Shark is a large requiem shark that looks similar to other members of this family: it skews larger than reef sharks and has a leaner build than bull sharks. Despite its name the shark is found in many parts of the world, typically off tropical oceanic islands.

Pelagic diving is not for beginners. Unlike tropical reef diving, open ocean diving is more intense and demands a higher task load, especially when diving with a large camera. Conditions are dynamic and things can escalate quickly. All of our dives require transferring from the mother ship to the panga, which whisks us away in choppy seas toward the drop-off point. At the dive guide’s instruction (“on the count of three”), all divers back-roll into the water (i.e. fall backward off the side of the inflatable). It’s critically important to time this correctly so that all divers splash into the water at the same time, otherwise we could land on top of each other with heavy aluminum air tanks. Once in the water, the currents begin to pull, so we descend quickly and land together as a group at the dive site, usually a rocky outcrop about 70-80 feet deep. Again, time is of the essence, and we don’t have the luxury to drop slowly or to explore as we would on a calm tropical reef. We must get to the meeting point with the group, otherwise the current could pull us away.*

The blue-footed booby, one of Galápagos’s famous sea birds

With brisk currents and strong surge, the cloudy, nutrient-rich water is thick and heavy. Distant hammerheads patrol the deep open blue. Like many sharks they know how to remain just on the edge of visibility, at times making you question whether what you saw was an illusion. I can hear the squeaky chatter of dolphins communicating. They will make several appearances but move too quickly for a good photo. Schools of fish dance in the current. Behind me a large Galápagos shark has made a close pass near the ledge. 

My favorite encounter, and ultimately my one portfolio shot from this trip, is quite unexpected. As we conclude a dive near Wolf Island we encounter playful sea lions in the shallows. We quickly shed our dive gear and grab our snorkels for a closer look at these majestic pinnipeds. And how lucky we are! In what seems like a ballet performed exclusively for us, the sea lions put on an amazing display of agility and grace: bobbing, gliding, and spinning. I notice a sea lion swimming toward me so I remain motionless and prepare to fire off a few shots — in a split second the sea lion flips over and exhales a burst of bubbles, then cuts left and down into the deep. 

Although the philosophy in Galápagos is that you “never know what you will see”, on these dives we engage our peripheral vision, looking for that unmistakeable giant shadow to emerge from the darkness. We are planted on the rocky outcrop, observing the sea life in the current almost to the point of boredom. Then, with a shaking rattle, the dive guide musters the group and directs us into the open blue. The group does not see it yet, but we know from the guide’s excitement that this is something big. And then it appears, first as a lumbering blot of distant ink, moving darkness, eventually coming into spectacular view.

Perhaps the most unforgettable part of encountering a whale shark is feeling the volume of water that is displaced as the school-bus-sized fish swims past you

The author meeting a very large whale shark

I am very fortunate to have seen whale sharks several times in three different oceans, and it is not lost on me that many divers will spend a lifetime seeking these elusive giants. This whale shark is enormous (possibly pregnant), and with effortless sweeping of her caudal fin, it is almost impossible to keep up with her.

In addition to multiple dives in Wolf and Darwin Islands, we spent two afternoons observing wildlife on land: on North Seymour and Santa Cruz Islands. North Seymour was extremely productive, including encounters with the famous blue-footed boobies, frigates, as well as the Galápagos land iguana. Later as we hiked toward a field of boulders on the shoreline, we observed sea lions (mother and pup) and the Galapagos marine iguana. On Santa Cruz, we capped off the trip with an expedition up to the lush highlands to meet perhaps the islands’ most famous ambassador: the giant tortoise. On all the land tours my 100-400mm telephoto was perfect for close-up detail shots and the variable microclimates meant I didn’t have to wait long for favorable light conditions. 

For wildlife enthusiasts and avid divers, Galápagos is among the ultimate destinations. I hesitate to say once-in-a-lifetime because I hope to return… 

The real inspiration for Godzilla. Despite its fearsome appearance, the Galápagos marine iguana is a shy herbivore. 

No trip to Galápagos is complete without seeing its most famous ambassador: the giant tortoise


*Some ask: what would happen if someone missed the dive meeting point and drifted in the current? Hopefully there would be more than one person, as you should always stick with your dive buddy. Whether in a group or alone, if someone was adrift, the proper thing to do would be to ascend slowly and send up a surface marker buoy (essentially a long inflatable brightly colored tube about 6 feet tall — I have one as part of my standard gear for every ocean dive). The panga driver would be in the area would likely see the marker to come pick up the lost diver. We also had other protocols in case of emergency including a GPS beacon locator. Thankfully no one separated from the group. 

Twinkling Lights

The holiday season truly is a magical time of year to visit New York City. You’ll be hard-pressed to find a more festive city between Thanksgiving and New Year’s Eve (though I don’t recommend ambling anywhere near Times Square on December 31st). The most famous displays are in store windows along Fifth Avenue in Midtown, and the centerpiece is of course the tree-helmed ice rink at Rockefeller Center. There are many more commercial displays throughout the city, but some of my favorites to photograph are the ones put up by resident New Yorkers outside their homes. Manhattan doesn’t have the space for giant lawn fixtures, but that doesn’t stop it from having truly elegant Christmas decorations in many neighborhoods.

The Upper East Side of Manhattan has some of the most elegant displays in front of beautiful townhouses.

Photographing holiday lights is a simple task for most: the display is a stationary subject you can easily capture with a phone camera. But producing a high quality image is trickier than you might think. My first step is to find the right subjects — generally I find the Upper East Side of Manhattan to have the best residential holiday displays in the city. (If you want a more extravagant but suburban display visit the Dyker Heights neighborhood in southern Brooklyn — it is famous for its Christmas decorations.)

Another beautiful Upper East Side display.

I recommend a wide angle lens (mine is a tilt-shift 17mm) on a full frame camera. One challenge is that most streets in New York are lined with parked cars, so photographing from across the street means you’ll have a row of ugly vehicles in your shot). There isn’t much alternative to setting up on the narrow sidewalk right in front of your subject, or just off to one side — thus the need for a wide angle point of view.

I’ve seen photographers shoot in daylight, but holiday lights often are not switched on until dusk. I prefer evening and nighttime images. Since we’re relying on artificial but ambient light from the displays, streetlights, or home lighting, we require a relatively long exposure: anywhere from half a second up to 30 seconds. A tripod is a must with these long shutter speeds.

My favorite technique is to “stop down” or tighten the aperture to a narrow range, usually f/16. Narrow apertures on wide angle lenses produce brilliant “starburst” renderings of bright lights by effectively forcing the camera to “squint”. This creates a twinkling of the lights for an added magical touch to the subject matter. 

The tradeoff to a narrow aperture is that it increases the required exposure time and potentially the ISO.

“Twinkling” lights or starburst effects are achieved by stopping-down (i.e. narrowing) the aperture to f/16 or less.

While a 25-or 30-second exposure is not a problem for a tripod-mounted camera, if there is even a trace of wind it will cause motion blur on any moving elements in the image (tree branches, or loose hanging ornaments.). Therefore it’s best to shoot on calm evenings with low wind. You can increase the ISO to help bring down the exposure time, just remember that higher ISO produces more noise and reduces image quality.

Lastly, exposure for holiday lights can be tricky. I typically underexpose my image by about two-thirds stop or even a full stop to avoid blowing out the bright highlights. In post processing, I raise the shadows and increase exposure to bring out the background and low-lit areas. I also apply vignetting and selective dodging and burning to draw the eye toward the subject. For a dreamy look I sometimes apply a minor Orton effect. Lastly, I use a selective color filter to tilt the greens toward the cool side — think blue fir tree — for a more wintry look.

Use a selective color filter to tilt the greens toward the cool side for a more wintry look.

Montauk Art Show Recap

My debut at the Montauk Art Show was a success and, I hope, the first of many shows out in the Hamptons. Quite a bit of chatter among the attendees praised the “elevated” level of the artists and their works on display, and I was honored to be among the 75 artists chosen for this year’s show.  As you’d expect in a vacation beach town, many artists featured works with ocean themes: waves, sand dunes, seashells, a lighthouse, boats, and sea life. I chose a number of pieces including landscapes and underwater shots. Of course I had to feature a few shark images and they proved popular with the ocean-loving crowd. I don’t have any portfolio-level images set in the Montauk area, so I deferred to other local artists to fill that niche — I’ll never put forward mediocre work just because it fits the theme. 

It’s always interesting to see which images connect with different people. Arguably the most popular image of the weekend was this shot of a seaplane in Alaska.

Some people are eager to ask questions and chat while others want to be left to themselves to take in what they see. I never do the “hard sell” or pounce on potential clients — browsing a fine art show should be a luxurious experience and no one wants to feel like they are at a flea market. 

Ironically the first image I sold was neither summery nor ocean-inspired: it was this winter cabin in the Sierras. Some people are clearly done with the summer heat and are ready to curl up by the fireplace with a Bailey’s latte. Speaking of coffee, I have to rave for a moment about Hampton Coffee Company and the best iced coffee I’ve ever had, three days in a row. Divine is the word that comes to mind — simply outstanding.

One woman recognized this location in Arizona because her parents live about twenty minutes away. She was pleasantly surprised to see this mountain so far from home, all the way at the tip of Long Island. Western landscapes are not common in these summer shows (I was the only artist who had a couple on display), but more than a few art buyers appreciated seeing something a little different from the standard beach scenes.

I reserved a side wall for ocean and underwater images, the largest of which was a metal print of a great white shark. The display was arranged so this image could be seen from a distance and it certainly delivered the intended effect. I loved seeing kids get excited as they spotted the giant shark and ran toward the display. Then they got closer and saw the others: a tiger, a hammerhead, and a whale shark, as well as a pod of dolphins. That would have been me as child, no doubt. People had many questions from the basic (“where was this?”), to the sophisticated (“how do sharks react to the electrical impulses of a camera?”), to the absurd (“why didn’t it eat you?”). 

My favorite shipwreck image drew an older crowd including, notably, some veterans. Those who served in the armed forces instantly recognize a military ship and many are intrigued by its history — and this one doesn’t disappoint: it was the vessel that recovered the black box from the Challenger disaster.

Overall it was an excellent show and I met some terrific artists. If you are in the Hamptons in the summer make sure you don’t miss the next show!

Crocodile Photo Expedition

The latest video and second in the Extreme Snorkel Series is live on YouTube. Our first extreme snorkel adventure was a spirited swim with Atlantic spotted dolphins, but this time we turn up the heat and get into the water with the American Crocodile! We’ll travel to a remote atoll off the Yucatan peninsula and spend three days living in a stilt house with no electricity or running water. Dozens of hungry crocs live in the surrounding mangroves and we’ll get within inches of those famous teeth. Join me in this thrilling adventure, and don’t tell your insurance broker! Click the image below or go directly from here.

At least one of us was smiling

Photo Wonders

Here’s a recent write-up I contributed to Photo Wonders with some original photos of the world’s largest fish — the whale shark. Photo Wonders is an inspiring and informative website with a focus on travel photography including landscapes, cityscapes, culture, and wildlife. Professional photographers share valuable details about places to visit, when to go, gear and settings, and how to get the best images. Lots of great content there — check it out! [Update: as of Jan 2024, Photo Wonders is no longer an active web site]

This and many other articles are featured on Photo Wonders

Sneak Preview: Extreme Snorkel Series Vol II

The next video in the Extreme Snorkel Series is in production and I’m excited to share a sneak preview of the subject: we’ll get up close to photograph crocodiles in the wild. That’s right, we’ll travel to a remote lagoon off the Costa Maya in eastern Mexico to encounter the American crocodile (not to be confused with the American Alligator of the southern United States). This is no luxury safari with five star accommodations and comforts — we’ll be roughing it in a stilt house with no electricity, running water, or internet service; just raw nature and tropical beauty. Make sure you are subscribed to the BDPhotographs YouTube Channel so you don’t miss it!

COMING SOON!

Dolphin Photography

One of the common myths that I like to dispel in my role as a diving evangelist (yes, I preach to anyone who will listen, and many who won’t) is that there aren’t many opportunities for snorkelers to have amazing underwater encounters and photo opportunities. People typically limit their perception of snorkeling to a lazy glide over a tropical reef, but there’s so much more… In the first of the Extreme Snorkel Series, we travel to the Bahamas to share the ocean with the fast and playful Atlantic Spotted Dolphin. This is no gentle swim — the dolphins give us quite a workout as they interact with us and easily out-swim even the fittest of freedivers. Check out my tips and recommendations for dolphin photography in this episode.

And one more thing: although these awesome dolphin encounters are condensed into a fun 6-minute video, this was not an easy expedition. Photographing animals in the wild is nothing like going to an aquarium with guaranteed close-up sightings on demand. It took two visits to the Bahamas to obtain these images — the first time we got completely skunked due to high winds and choppy seas. I vowed to return a few months later and while we did get out to sea, one of the two days was nearly called off again due to winds. In any case, many photographers only showcase their successes, but behind every portfolio shot are numerous failures due to logistics, weather, bad lighting, or human error. No one likes going home empty handed with greater wisdom. We shouldn’t dwell on the negative, but we should acknowledge the difficulty, learn from mistakes, and savor the triumphs. So grab your sunscreen and let’s meet some wild dolphins!

Art Expo New York Recap

In October I appeared at Art Expo New York presenting original images in one of Manhattan’s largest fine art trade shows. Over 200 galleries, collectives, and independent artists displayed their work at the show, which for most attendees was the first fine art show they attended since 2019, pre-pandemic. Many friends and family in the New York area were there to show support and enjoy New York City in the fall — arguably the best season in the city.

I selected eight works to display, showcasing landscape, underwater, and wildlife subjects. Each image was accompanied by a short story printed on card stock and displayed near the framed work. For those who were unable to attend, most of these prints are available for purchase through Art Expo New York’s online gallery. A selection of works is displayed below.

“Alien Lake” was the largest print of the exhibit

ALIEN LAKE

Tucked in the foothills of the eastern Sierras, Mono Lake is a prehistoric alkaline lake dotted by bizarre limestone tufa. On calm evenings, such as the one photographed in this image, there is an otherworldly stillness and sense of quiet, broken only by the occasional coyote call. Though not as famous as the Great Salt Lake, Mono Lake has featured in obscure popular culture from an early work of Mark Twain to an album inset by Pink Floyd.

TRAILS

The origin of these unique rock trails in a remote desert basin remained a mystery for centuries. Some theorized they were created by hurricane-force winds pushing rocks across slick mud, while the more superstitious believed ghosts or aliens were behind the strange sailing stones. After several decades of study, the rocks were observed in motion in the winter of 2013 — pushed along by floating ice sheets in the flooded playa. Visiting this location requires significant off-road travel deep in Death Valley National Park.

“Trails” was the most popular image on display

“Grey Ghost” is a nod to the significant set of underwater images in my portfolio. It also captures a theme in many of my photos — nature overtaking human creation.

GREY GHOST

The USS Kittiwake, formerly a submarine support ship, served the US Navy for five decades and retrieved the black box in the aftermath of the Space Shuttle Challenger disaster. Today she rests in water seventy feet deep in the Cayman Islands. A dive bell (in the distance on her port side) still contains an air pocket inside — divers enter from below and can break through the surface to have a brief chat underwater. Originally positioned upright, the Kittiwake was knocked on her port side by Tropical Storm Nate in 2017.

KING SALMON

Classic stick and rudder flying is ubiquitous in Alaska, the state with the largest per capita population of licensed pilots in the United States. For many visitors arriving in Katmai National Park in the Alaskan peninsula, a seaplane is the preferred method of travel — there are no roads connecting the park with nearest town of King Salmon. Brown bears are a common sight on the very banks where this DeHavilland Beaver is parked. As I photographed this plane, my travel companions kept watch on the nearby forest behind me.

“King Salmon” was one of two images set in Alaska and is a tribute to my lifelong love of aviation

10 Tips to Photograph in Harsh Light

We know the most fundamental principle of photography is the quality of light. Outdoor photographers learn quickly to shoot in the periods near sunrise and sunset for soft, directional, and colorful light. The quality of light is the magic: a fairly mundane subject bathed in golden light can look brilliant, while a spectacular icon in poor light can be profoundly uninspiring. Consider these two images — which photo is more pleasing?

Blog_KL.jpg
Blog_Colosseum.jpg

In the first example (L), a slab of limestone glows during the golden hour in the Florida Keys. In the second photo (R), the iconic Colosseum stands surrounded by tourists at lunchtime.

Even the most committed Europhile can see that the sunset image is the winner, and that the contest is decided entirely by the superior quality of light. But high quality light is fleeting and elusive, and most of the time light is either harsh (in sunny weather) or diffuse (when it’s cloudy). Overall the opportunity to photograph in high quality light is approximately one hour in the morning and another in the evening — if the weather cooperates. 

So what are we to do with the many hours of daylight where the quality ranges from mediocre to terrible? (Top answers from photographers: “edit photos”; “travel to the next spot”; “get some sleep.”)* Although harsh light creates a jarring contrast of unpleasantly bright highlights and dark shadows, not all harsh light is untenable. In some instances it even provides superior opportunities to shoot. Let’s look at how we can make the best of these daylight hours.

*Not an official poll

1. CROP OUT THE SUN. To begin, we should qualify that harsh light is not a singular condition — it varies by time of day, time of year, weather, and location. In general daytime shooting is better in the winter when the sun is relatively low throughout. In this wintry scene, the sun provides bright but directional light onto our subject, while the snow acts as a natural reflector and brightens the darkest areas.

Winter is arguably the best season for daytime photography because the sun is always relatively low, especially at the more temperate latitudes.

Winter is arguably the best season for daytime photography because the sun is always relatively low, especially at the more temperate latitudes.

2. SHOOT DIRECTLY IN TO THE SUN. I know, it sounds crazy, but when the sun is not directly overhead, we have an opportunity to include it in our shot. Think about a child’s drawing that includes the sun in the corner, beaming down onto the scene. In this example the morning sun (approximately 9:45 a.m. in autumn) radiates across a blanket of clouds below Mt. Washington, New Hampshire. I used a tight aperture (f/22) to achieve the sun-star effect. For a cleaner image, make sure to remove any filters from the front element of your lens before shooting directly into the sun. 

In this example the subject makes the shot. The harsh light is forgiven because we are looking down a road above the clouds.

In this example the subject makes the shot. The harsh light is forgiven because we are looking down a road above the clouds.

The next several examples are related in concept: each involves using a natural filter to control or block out the overhead light. 

3. SHOOT UNDERWATER. Underwater photography is one of the few instances in which bright overhead light can be beneficial. A signifiant amount of ambient light is absorbed by water, especially at depth where most shipwrecks lie. In this case the ship (L) is in water approximately 65’ deep so bright filtered sunlight is a welcome addition to our scene. We don’t need to dive down into the depths to appreciate the overhead sun, however. A southern stingray (R) swims in waist-deep water as the morning sun creates a web of texture across the sandy bottom. 

In deep water we need all the light we can get so midday sun is welcome.

In deep water we need all the light we can get so midday sun is welcome.

Not a diver? No problem. This was shot in water three feet deep.

Not a diver? No problem. This was shot in water three feet deep.


4. USE THE FOREST CANOPY. Trees act like a giant colander that can create dappled light, and — in humid conditions — sun rays. Each day is different and the light changes constantly throughout the day. Below: Midday sun streams through the forest canopy onto the ravine below, lighting up this magical gorge. 

Blog_Gorge.jpg

5. NARROW YOUR SCENE. Look for locations protected from the harsh daylight such as narrow streets and natural canyons. Near the Arizona-Utah border, direct light hits narrow slot canyons only for a short period of the day, and only in summer months. 

Blog_Antelope.jpg

6. SHOOT IN THE SHADOWS. Focus in on smaller scenes and details in the even light of the shadows. Maybe you’ve found an interesting sculpture, a beautiful doorway, or an unusual plant. The key here is that your complete scene should be in shadow and protected from the blinding sunlight. I took this portrait of two Bedouin friends in a tent at about 2PM while the sun was blazing over Wadi Rum, Jordan. 

Blog_Bedouins.jpg

7. EMBRACE THE WASHED OUT LOOK. You can use the harsh daylight to your advantage if you want to incorporate silhouettes and more muted color in your scene. In this image, shooting toward the sun creates a washed out look. Silhouetted palm trees contrast with a bright sky and the whole scene takes on the look of a vintage postcard. I applied additional edits in Photoshop to accentuate the effect.  

Harsh light can give a diffuse washed-out look a scene. Moody shots like this work best when clouds filter a portion of the sunlight.

Harsh light can give a diffuse washed-out look a scene. Moody shots like this work best when clouds filter a portion of the sunlight.

8. SHOOT EDITORIAL / DOCUMENTARY. When the daylight offers prosaic scenes, record some of the details of time and place. There is value to capturing images “behind the scenes” even if those photos will never become portfolio pieces or social media shares. Below: after a morning of photographing Atlantic Puffins from a blind on Machias Seal Island, I photographed the blind and the remote island itself to include in an article about the experience. 

This image won’t win any awards, but it is not meant to… it tells a story in a larger collection of photos.

This image won’t win any awards, but it is not meant to… it tells a story in a larger collection of photos.

9. SEND UP THE DRONE. Shooting directly down in midday sun creates an even, brightly lit scene — similar to  shooting under an overcast sky, just brighter and warmer. Look for interesting patterns and textures. Remember that you can easily over-expose bright colors in this light, so if you want to retain detail in the highlights, you may need to underexpose by one or two stops. This beach image was inspired by Neopolitan ice cream, and captured under the blistering Maldivian sun. 

In between dives in the Maldives I sent up my drone to record some b-roll footage for a video about underwater photography. The sun was scorching and there were no obvious photo opportunities so I took a few top-down shots and packed it up. Later wh…

In between dives in the Maldives I sent up my drone to record some b-roll footage for a video about underwater photography. The sun was scorching and there were no obvious photo opportunities so I took a few top-down shots and packed it up. Later while reviewing the photos I cropped this beautiful beach scene from what looked like a throwaway shot. It has since become one of my more popular images.

10. SHOOT INDOORS. This might seem like a cop-out but if your goal is to make great images and the light outside is just not happening, why not take the shooting inside? Consider this an opportunity to experiment with different locations and compositions. Shooting indoors is also good practice to work with low light conditions and push the capabilities of the camera. My favorite place to shoot in New York City is actually indoors in the period rooms at the Metropolitan Museum of Art. 

The period rooms at the Metropolitan Museum of Art always deliver a stunning visual experience.

The period rooms at the Metropolitan Museum of Art always deliver a stunning visual experience.

Of course, we’d prefer to shoot scenes in the morning golden hour or at sunset, but if that sweet light lasted all day the resulting images wouldn’t be nearly as special. Next time you find yourself in harsh light conditions, consider all the opportunities you still have to create great images. 

The Graveyard of the Atlantic

We’re going back into the water in the latest episode, this time to explore what lurks in the ‘Graveyard of the Atlantic’ off the coast of North Carolina. We’ll photograph a true ghost of war: one of Hitler’s infamous U-boats that went down with over a dozen men still inside. We’ll also have intimate encounters with the sharks that patrol these shipwrecks and we’ll bring home some of their fallen teeth. (And this time no sharks attempted to eat my camera.) Join me 100 feet below to see what lies at the bottom of the ocean. 

This video was a challenge to put together because of the low light levels during these deep dives. All of the underwater footage was filmed on GoPro cameras using natural light which meant really pushing the capabilities of the cameras. Nonetheless, the experience of the dives and the photos themselves come across, so forgive the grainy footage and enjoy the adventure.

Most of the footage was filmed in July 2020 during the coronavirus pandemic. While diving was affected by some of the anxieties felt everywhere, with necessary precautions implemented, it was an amazing return to normalcy the second everyone hit the water. Below the surface, everything was exactly as it had always been: no hand sanitizer, social distancing, or worries about illness. It was a welcome glimpse of the past and the future during a very difficult and unusual present. 

Lots more underwater content here if you want to see more sharks, mantas, turtles, and reefs.

The U-352, one of Hitler’s infamous U-boats in the Second World War. The submarine was sunk after firing a torpedo at — and missing — the US Coast Guard Cutter Icarus. Not the most photogenic wreck I’ve visited, but easily the most meaningful.

The U-352, one of Hitler’s infamous U-boats in the Second World War. The submarine was sunk after firing a torpedo at — and missing — the US Coast Guard Cutter Icarus. Not the most photogenic wreck I’ve visited, but easily the most meaningful.

A sand tiger shark cruising inside the wreck of the USS Aeolus. Despite their fearsome appearance, sand tigers are laid back and tolerant of divers. This one swam just a couple feet in front of me and posed for a photo.

A sand tiger shark cruising inside the wreck of the USS Aeolus. Despite their fearsome appearance, sand tigers are laid back and tolerant of divers. This one swam just a couple feet in front of me and posed for a photo.

If you’re interested in photography and supporting small business, check out Adorama

Beware of the Scams!

In today’s post I’ll share a cautionary tale about scammers and a particular con aimed at small businesses who deal in art, photography, and crafts.

When the coronavirus was declared a global pandemic, security experts warned us to be ready for an onslaught of fraud and hacking attempts. Unscrupulous types take advantage of fear and panic, knowing that people will be vulnerable and let their guard down while they are preoccupied with concerns about their family’s health and the economy. It didn’t take long for these trolls to come out of their holes. My personal email receives daily phishing attempts — usually they’re spoofed messages from Netflix or PayPal. But lately I have received inquiries of a different sort through my website. Instead of the old phishing attempts, these scams are from interested parties looking to buy product. Let’s look at an example:

Warm Geetings [sic] to you from cook island. My name is Micheal Leon , I am willing to make some purchase of some items in your company,before we proceed,can you answer the question below.

1,Do you have POS machine to charge credit cards

2,Do you accept mater and visa card payment mod

3.Do you accept private pick up by our forwarder

4Can you send me your price sheet,website or catalog

Kindly email me if all this is possible to ship to cooks islands

Regards, GOLDEN STAR STORES INC 17/19 Paramount Roadsuite 34 Clarkes Building Parekuta Rarotonga Cook island [Phone number redacted]

There are many scams out there — watch your back!

There are a few red flags in the message. First, the buyer is in a country in which I have no business relationships. As much as I’d like to be a global art provider, I find it odd that someone is interested in selling my prints at gift shop in the South Pacific.


Interested in starting a website or blog? I use Squarespace as my platform. Get started for free — click the image below.


Second, the inquiry does not specify any real product interest. I sell two things: 1) fine art prints, and 2) my time, in the form of assignment, public speaking, or private workshops/tours. The buyer says only that he is “willing to make some purchase of some items in your company”. There is no reference whatsoever to any product — not even a nod to the correct industry (“I’m interested in some photos.”) This is just lazy copy that is obviously used over and over again with a variety of businesses.

Third is the reference to private pickup. Sound the alarms any time a buyer tries to bypass a reputable shipping company. This scam at its conclusion would try to get me to pay the “shipping company” an amount and then invoice the buyer. The shipping company would be phony, of course, and the money would be gone…


I use Adobe Photoshop and Lightroom to process all my images. Try them for free using this link.


Finally, there is no record of this buyer’s business — a simple internet search confirms the company doesn’t exist except in other scam attempts. I received another version of this scam a few days later, this time from a “buyer” in Nicaragua. Again, there was no reference to a specific product and there was a request for pickup by a private freight company. Amazing that I’ve expanded into the South Pacific and Central America in less than two weeks!

The best way to protect yourself against these shady characters is to implement certain selling practices and follow them consistently. These are some of the processes I stick to:

  • Never ship items until you receive full payment first. If you allow payment on delivery, only do so with established clients and always take a deposit.

  • Accept payment only through legitimate processors (Square, PayPal, etc.)

  • Use only reputable shipping companies (UPS, Fedex, DHL, etc).

  • Do not accept more than the amount due (no making change).

  • Be especially wary of international orders, particularly from countries in which you have never done business before.

  • Beware of unusually large purchases, they are likely too good to be true.

  • Do not allow items to be picked up from a private residence (i.e. don’t let shady people know where you live!)

Stay vigilant, and be careful out there!


Back In The Water ...

It’s been a year since I launched the BDPHOTOGRAPHS YouTube channel, with the goal of sharing the experience of photography, providing photo tips, and including filmmaking in my book of work. A year ago we kicked off with an adrenaline-packed shark photography adventure, and in this episode we return to the water to look at the fundamentals of underwater photography. We’ll meet giant mantas, big sharks, friendly turtles, and a variety of photogenic sea life. We’ll check out shallow sandbars, deep shipwrecks, and learn about the different gear needed to make it all happen — see below for some recommended items. Almost all of the footage is original and behind the scenes of real dive trips I have taken so I hope you’ll enjoy spending some time in the water with me. Once again, thanks for watching, and please subscribe! 

We go back into the water to photograph giant mantas, big sharks, friendly turtles, and haunting shipwrecks. In this video we'll learn the basics of underwat...


Interested in starting a website or blog? How about a place to display your photos online? I use Squarespace as my platform. Get started for free — click the image below.


Some links to underwater photo gear are below. It’s best to talk to a professional who has experience in the water with camera gear, not just a sales rep who knows the equipment.

Waterproof case for iPhone

ProShot Case for iPhone XR & iPhone 11 https://amzn.to/2KqEulz

ProShot Case for iPhone X & XS https://amzn.to/2VqRr57

ProShot Case for iPhone 8 Plus, 7 Plus, and 6 Plus https://amzn.to/2RWFLVM

Action Camera

Paralenz https://adorama.rfvk.net/odWjO

GoPro Hero 8 Black Edition https://adorama.rfvk.net/xdPA1

Compact Consumer Camera

SeaLife https://adorama.rfvk.net/OAJ6W

Pro Gear

Professional level gear is almost exclusively camera specific — housings are designed with controls aligned to the buttons and switches of individual camera models. Nauticam, Aquatica, Ikelite, and SeaCam are well-known manufacturers that offer custom underwater housings for popular DSLR and mirrorless cameras. They also offer strobes and related accessories. Once you invest in pro quality camera gear, I highly recommend insuring your gear — and make sure your policy includes an underwater rider; standard policies usually don’t cover taking your camera into the ocean!


If you’re interested in photography and supporting small business, check out Adorama

Polar Bears!

They appear in Coca Cola ads every year as the holiday season approaches. They are a symbol of the arctic and a poster child for climate change campaigns. They are magnificent animals, formidable predators, and incredibly well-equipped to survive in the most unforgiving latitudes of the planet. Join me in this video blog to photograph the undisputed king of the north: the polar bear.


Interested in starting a website or blog? How about a place to display your photos online? I use Squarespace as my platform. Get started for free — click the image below.


If you’re interested in photography gear and supporting small business, check out Adorama

Haunting Imagery for Halloween (and All Year Long)

There are definitely subtle nods to urban exploration (urbex — or more accurately, rural exploration i.e. rurex) in my portfolio. The use of abandoned homesteads, shipwrecks, and railroads makes for great mood and compelling subjects. The center image of an abandoned mountain railway, taken in Taiwan, is one of my most popular. 

Urbex.jpg

Abandoned and macabre places have long been a source of fascination to me, especially as someone who grew up a fan of horror thrillers from Hitchcock, Stephen King, and just about anything from the ‘80s. In the latest behind-the-scenes video I’m going to share some images not typically showcased in my portfolio — images that are grittier and outside my normal color palette.

We’ll photograph inside an abandoned theater, visit a creepy graveyard, and check out Stephen King’s house.

We’ll also discover the best lens for photographing abandoned places and learn the importance of applying contrast to grayscale images. As always the video is short, densely packed with content, and relatively non-technical. Enjoy!

Explore different ways to make haunting images in this episode. We'll visit an abandoned theater, forgotten railroads, creepy cemeteries, and even photograph Stephen King's house. We'll take long exposures in near darkness, apply creative techniques, and just have a wickedly good time.

The Amazing Milky Way

If you watched “The Amazing Milky Way” we travel together to the California desert to photograph the Milky Way in the late night hours. My videos are focused on the “experience” of photography and deliberately are not technical … so if you find yourself here it’s probably because I promised in the video to give you more details about gear and technique. I’ll offer one caveat before I make your head spin: astrophotography is its own beast, and there is an entire community of enthusiasts — some might say fanatics — with strong opinions. There’s no way to cover everything and every exception to the rule in a single blog post so I’ll offer the basics and some advice: there is a ton of information out there about photographing the night sky. Read, watch, practice, and discover what works best for you. Better yet, join me on an upcoming photoshoot. Ok, here we go:

GEAR

The Milky Way is big — very big — and you’ll need a wide frame of view to capture it. Most astrophotographers prefer a full frame DSLR/mirrorless camera body over a crop-sensor both for the superior low light performance and the wider field of view. The Sony A7RIII is arguably the champion in this area, followed by the Nikon D850 and Canon 5D Mark IV. The hardcore will have their cameras  modified for astrophotography, though doing so instantly voids the manufacturer warranty and necessitates the use of an additional filter for daytime shooting. If you’re just starting out I don’t recommend having your camera astro-modified — it seems to be something people do with a second (usually older) camera. 

Wide angle primes are the favorites for milky way photographers because they are sharper and faster than most zoom lenses. The Sigma 14mm F1.8 is a standout in my opinion, though I have had very fine results using a more standard EF 24-70mm F2.8L. I have tried using a slower F4 lens and find that it just doesn’t perform well enough for astrophotography — you’ll need to shoot wide open and it still doesn’t compete with faster glass. The beauty of an F1.4 lens is that you can stop down to 2.0 for a sharper and plenty-wide aperture. Astrophotography is one of those niche art forms so you’ll need to decide whether your more general lenses will suffice for the occasional astro shot, or if you need a specialty lens for nighttime shooting. Either way, I recommend something with a wide end near 16mm and F2.8 or faster. 

Tripods seem to be the place where photographers get cheap and I’ve heard more than one cautionary tale about skimping on quality. I understand the desire to pour most of your hard-earned dollars into good glass, but if that investment is not resting on something firm and dependable, you could end up spending much more than you want to. I have never been disappointed by the Gitzo Systematic system, and am also quite happy with the more affordable Sirui EN 2204.


Interested in photography gear and supporting small business? Check out Adorama


Two different techniques. The left is a single shot image — I hitched a ride on my friends dinghy to get out to this lighthouse and had fifteen minutes to shoot. The right image is a time blend, where the foreground was shot during blue hour and the…

Two different techniques. The left is a single shot image — I hitched a ride on my friends dinghy to get out to this lighthouse and had fifteen minutes to shoot. The right image is a time blend, where the foreground was shot during blue hour and the night sky several hours later. Both were shot with a 24-70mm lens at 24mm.

TECHNIQUES

Single Shot: The simplest and easiest method in which the sky and foreground are captured in a single exposure. This is how most people start in astrophotography and is the one to use if conditions change rapidly (e.g. partly cloudy night with changing visibility) or if you are in a hurry.

Panorama/Vertorama: just like the daytime use of this technique, several overlapping shots are taken to capture a broader scene, and then the exposures are stitched together in post-processing. This is a good alternative to the single shot if a) your lens isn’t wide enough to capture the scene, or b) you want a higher-resolution image.

This image is a 7-shot panorama of vertical (portrait-oriented) images. I used a medium-wide 28mm prime lens.

This image is a 7-shot panorama of vertical (portrait-oriented) images. I used a medium-wide 28mm prime lens.


Interested in starting a website or blog? How about a place to display your photos online? I use Squarespace as my platform. Get started for free — click the image below.


There are several methods of multi-shot astrophotography but they’re all meant to accomplish the same goal: to increase the signal to noise ratio in the shots. Because night photography is shot in low light, we typically need to raise the ISO (i.e. sensor sensitivity) which results in greater image noise. To compensate for the greater noise, astrophotographers use different techniques:

Stacking: The same shot is taken multiple times in immediate succession. The images are “stacked” in a post-processing software application like Starry Landscape Stacker. Because noise is slightly different in each exposure, the software uses statistics to retain the consistent pixels (signal) while discarding a lot of the noise. Stacking is my preferred method of image-making, but it requires advance planning and significant work in post.

Tracking: The camera is mounted on a tracker (sometimes called a “star tracker”) which is a device that moves in counter-rotation to the earth’s natural spin. This permits longer exposures (where a longer shutter means a lower ISO) without the appearance of star trails*. Some photographers combine tracking with stacking. Unless the image is of the sky only, tracking necessarily requires blending with separate shot(s) (in which the tracker is turned off) for the foreground. Once again, this technique requires a lot of work in post.

Time Blending: In this method the foreground is photographed while there is still some available natural light, such as during blue hour. This permits a lower ISO shot to be blended with sky images shot later in the night. The classic time blend requires leaving the tripod — unmoved — in the exact same spot for both shots. A more liberal version of this would be to return to the same spot for the later shot. Purists will consider this a composite image — not necessarily a bad thing, but something that could be disqualifying for photo contests or publication.

Compositing: Just as the name implies, a foreground and sky — which may be from different locations at different times — are combined into a single image in post. I am not opposed to compositing as a technique to achieve a realistic outcome, but I don’t care for impossible shots. Humor the rest of us and make it seem real. When a photographer was published in National Geographic with obvious fakes, the astrophotography community went ballistic. I’ve seen too many ridiculous images of the Milky Way arching over Manhattan (light pollution makes this impossible) — made even more absurd by the fact that the camera is looking up Broadway (i.e. facing north, where the Milky Way would never be). To me these types of images belong next to posters of unicorns and dragons at the mall fantasy shop.


I use Adobe Photoshop and Lightroom to process all my images. Try them for free using this link.


My preferred technique: this image is stacked, 6 shots for the sky, and a single image (with flash) for the foreground. In some instances I also stack the foreground, especially when using natural light only.

My preferred technique: this image is stacked, 6 shots for the sky, and a single image (with flash) for the foreground. In some instances I also stack the foreground, especially when using natural light only.

SETTINGS

This is the question I get more than any other: what were your settings? Usually the answer is “I don’t remember but it was something around …” Settings really depend on the specific shot and the light in a particular scene. The rule of 500 is a good guideline: divide the focal length of the lens into 500 for the maximum shooting time to avoid star trails*. For example, with a 24mm lens: 500/24 = 20.83, so you wouldn’t want to shoot for more than 20 seconds. Use this as a boundary more than prescription — I find that pulling back from that limit is a good idea if you want the shot viewed in any decent resolution.  A typical setting for my astrophotography is Aperture 2.0-2.8, Shutter 15-20 seconds, and ISO 5000-6400.

*Star trails: in a long exposure, the rotation of the earth relative to those stars makes them appear as streaks or lines rather than dots.

Introducing the BDPhotographs YouTube Channel

BDPhotographs is now live on YouTube! If you enjoy the content here, I’d encourage you to subscribe, like, and share, tell your neighbors, all that jazz… The channel will add a video dimension to the photography techniques and tips that I use in my images (without being long-winded and technical, I promise!) Often there are interesting stories behind the images — challenges, surprises, successes, and failures. Videos will also take viewers behind-the-scenes to see where, when, and how images are captured. I can’t think of a better way to kick off this new channel than to take viewers underwater with me to get up close and personal with my favorite animals — sharks! See a great hammerhead shark bite (and spit out) my camera in distaste. Come for the sharks, stay for the photos, and subscribe for the next video. Thank you!

10 Reasons Why You Should Book an Ecotour

For many people an African safari is the ultimate ecotour. Not all safaris are the same so it’s important to do some research about the types of animal encounters you can expect in different places.

For many people an African safari is the ultimate ecotour. Not all safaris are the same so it’s important to do some research about the types of animal encounters you can expect in different places.

Ecotourism is a broad category of tourism that focuses on natural environments and typically supports conservation efforts. If you think that sounds fairly dull or too academic, think again. Often ecotours seek sightings of specific wildlife, and sometimes they require travel to the most remote places on the planet. Some may mean roughing it in the bush, while others pamper you with Michelin-starred cuisine and luxurious accommodations. Some ecotours are open to large groups — cruises to Antarctica, for example — while others are exclusive to just a few people. Ecotours can be inexpensive day trips or very pricey and lengthy excursions — or anything in between. Whether it’s an African safari or a visit to the polar regions, one thing is for sure: ecotours are some of the most thrilling and memorable trips you’ll ever take. Here are 10 reasons to book one:

1) Animals roam free. It’s the opposite of visiting a zoo: you get to go in a secure place while observing animals in their natural habitat. On most African safaris, a few guests will be driven in open vehicles to different locations where animals could be. A tracker and ranger work together to locate the animals — they could be in many different places at any time — and part of the fun is finding them. Other ecotours may have you enter a “blind” which is a shed or similar structure that has been built into the natural environment to allow observation with minimal disturbance to the animals. Underwater dive trips typically put divers or snorkelers in open water with wildlife, or in some instances in a cage to safely observe sharks. On many trips, proximity to the animals is astonishingly close and photo opportunities are plentiful.

2) Avoid the crowds and selfie sticks. If you’ve been to Paris or New York in the last ten years you know there’s almost no such thing as low season. Tourists are everywhere, museum queues are endless, attractions are over-crowded, and Instagram is saturated with the same selfie a million times over. Ecotourism usually limits the human impact on a place by restricting the number of people who can visit. Sometimes this is achieved by a lottery, by limited spots, or by prohibitive cost.  

For scuba divers ecotours are the most common type of trip. There are many options: day trips, week-long dive packages at resorts, and live-aboard boats (which are essentially dive cruises). Live-aboards have the advantage of being able to reach rem…

For scuba divers ecotours are the most common type of trip. There are many options: day trips, week-long dive packages at resorts, and live-aboard boats (which are essentially dive cruises). Live-aboards have the advantage of being able to reach remote dive destinations.

3) It helps to keep animals alive. There’s a controversial cliche in the economics of ecotourism: “if it pays it stays” — the concept that wildlife is worth more alive than dead, and used to promote tourism over hunting or exploitation of animals. This has worked wonders in parts of the developing world where communities have shifted from an unsustainable extraction economy to a renewable one based on ecotourism (e.g. manta ray tourism in parts of southeast Asia). The problem with this of course, is that while many people will pay high sums to see “popular” animals such as lions and polar bears, almost no one will take a tour to see the endangered Greater Sage Grouse which is severely threatened by habitat loss. Will anyone really infuse cash into saving an ugly but important insect on a different continent? Unlikely. Nonetheless, every dollar supporting ecotourism helps the industry to grow while boosting the economic value of the animals and their environment. The hope is that as an environment becomes more valuable, all species within that environment will be protected and preserved. 

4) You can meet interesting people. Ecotours are a great way to meet other people who share your passions for nature, travel, photography, or other interests. I speak from experience having met some incredible people from all over the world on various trips. Sometimes you can meet people in faraway places and discover you actually live near one another. 

Seeing big animals often requires travel to remote areas. The brown bears of the Alaskan peninsula are some of the largest the world.

Seeing big animals often requires travel to remote areas. The brown bears of the Alaskan peninsula are some of the largest the world.

5) Disconnect and go off the grid. Ecotours sometimes require travel to very remote places. Some of these locations are beyond reach of cellular service or wifi — think remote mountainous regions, or excursions at sea. This is a great excuse to unplug and go offline. You’ll find the break from daily news, email, and social media refreshing. 

6) You’ll have rare visibility into natural animal behavior very different from the myths and drama on television. While on safari I was surprised to learn that African lions, whom we think of as majestic predators, scavenge as often as they hunt; and that hyenas, whom we think of as scoundrels, actually hunt more often than they scavenge. Seeing animals in the wild often shatters the myths that popular culture has created around their personas. One word of warning: nature is not always pretty, especially when an animal is hunting its prey. Natural predations are sanitized on television to appear much quicker and cleaner than they actually are. In real life, a kill can be a lengthy and bloody affair. 

Nature can sometimes be difficult to watch. In South Africa’s False Bay, early morning ecotours observe natural predations by great white sharks on seals.

Nature can sometimes be difficult to watch. In South Africa’s False Bay, early morning ecotours observe natural predations by great white sharks on seals.

7) Immersion in nature. Ecotours may take you to some of the last unspoiled areas on earth. Whether you are visiting the backcountry of Alaska or a local nature reserve, you will see places that are a little bit closer to prehistoric times without the encroachment of human civilization. There was a time when animals roamed the earth in abundance. Ecotours show you glimpses of that world. 

8) Unique photo opportunities. Imagine yourself in places with the opportunity to capture photographs most people dream about. For nature photographers, ecotours provide access to capture images most people will only see on television or in magazines. 

Ecotours need not be formally organized or expensive. A visit to a local wildlife refuge or nature preserve can provide excellent wildlife viewing opportunities. Talk to a ranger or local biologist for tips on when and where to visit. In New Mexico’…

Ecotours need not be formally organized or expensive. A visit to a local wildlife refuge or nature preserve can provide excellent wildlife viewing opportunities. Talk to a ranger or local biologist for tips on when and where to visit. In New Mexico’s Bosque del Apache Wildlife Refuge, winter is prime season to observe sandhill cranes and many other birds.

9) Memories for a lifetime. I cannot overstate how special it is to witness nature. You will never forget the first time you see your favorite animal in the wild. You’ll remember the sights, sounds, and smells, and possibly be surprised just how big — or small — that animal really is. 

10) You become part of the conservation movement. I’m not suggesting that every visitor to an ecotour is automatically an activist, however, by participating in ecotourism you are voting with your dollars in support of conservation. By sharing your photographs and stories with others, you become an advocate — without necessarily being political — for animals and nature.

The short summer in “downeast” Maine is an opportunity for Atlantic Puffins to raise their chicks. Ecotours to Machias Seal Island — which is disputed land between the US and Canada — run daily from June into August.

The short summer in “downeast” Maine is an opportunity for Atlantic Puffins to raise their chicks. Ecotours to Machias Seal Island — which is disputed land between the US and Canada — run daily from June into August.

A few more considerations, now that you’re convinced … 

  • Remember that most ecotours are seasonal, though some run year-round. Many major ecotours require advance planning, sometimes a year or more ahead of the trip date. A week in the Serengeti or Galapagos almost certainly will be booked a year or more in advance. Most ecotours take a deposit to hold your spot and require payment in full before the trip date. Look closely at the cancellation policies and determine whether you can commit. Trip insurance is a must — consider it a protection of your investment. 

  • Be wary of and avoid unnatural entertainment disguised as ecotourism. The most common example is the “conservation petting zoo” that allows you to pet or hold potentially dangerous animals such as tigers, lions, or wolves that have been habituated and sometimes drugged to permit interaction with people. Often these attractions will have baby animals as their big sellers (who wouldn’t love to cuddle a tiger cub or a wolf pup?) I won’t go into all the dark places these operations dwell but I can assure you the hidden side to these businesses is not pretty. 

  • Before your trip, consider visiting a local zoo to practice your wildlife photography skills. Better to find out your shutter speed is too slow before your big trip. 

  • Know that while some ecotours can be very expensive, there are opportunities for most budgets. If a two week safari is not feasible right now, a half-day whale-watching trip could be an option. Camping is an affordable way to visit many national parks and has the added advantage of being much closer to the attractions than many lodges and hotels.